Secure Shell (SSH)
Page Editor: @allopole
To request edits to this page, open an issue, and tag @allopole
-
If you don't already have SSH keys, generate a pair. On Mac and Linux, this can be done in a terminal by running
ssh-keygen, pressing enter a few times to accept the default setting, and selecting a password for the key (you won't see the password as you type as a protection against shoulder surfing). On Windows, you can install an application called putty and generate a key as described here. There is also an ssh program available on Windows 10 that you can use which works very much like the Mac and Linux ones. -
If you have an account already and know how to add the key (there are some instructions on that below), you can put this key in place on the computer yourself. Otherwise, just send your public key file to the system administrator for Odum School of Ecology, Tyler Ingram ([email protected]). Ask Tyler to create an account for you if necessary and place the SSH key in
~/.ssh/authorized_keys. -
Connect to the computer using an SSH client, your username, and the computer's IP address. For example, on a Mac or Linux system, enter
ssh [email protected]at a terminal to connect to one of the lab's high-memory systems. Windows user can enter that information into the appropriate fields in the putty application and click a button to connect. Note that for you to be able to connect from a computer that is not on UGA's computer network, your computer must be connected to UGA's virtual private network (VPN).
SSH stands for Secure Shell, a communication protocol. We typically use SSH to maintain remote sessions on high-performance computers from laptops and personal workstations connected by the network. Also, establishing an SSH connection is a first step in other common tasks such as transferring files between computers and connecting to an RStudio server.
An SSH server is running on several of the shared computers in the Drake Lab. The following table contains the IP addresses and ports needed to connect, as well as a summary of the hardware on each system.
| UGA network hostname | Drake lab nickname | location | IP address | SSH port | memory | # cores | CPU GHz | Graphics card |
|---|---|---|---|---|---|---|---|---|
| OSE-WS191 | Noisy Narwhal | Drake Lab 150 (back room) | 172.18.244.86 | 22 | 188G | 32 | 2.1 | ATI Mobility Radeon HD 5430 |
| OSE-WS148 | Silent Salamander | Drake Lab 150 (back room) | 172.18.244.88 | 9922 | 188G | 24 | 3.47 | ATI Mobility Radeon HD 5430 |
| OSE-4094 | Mellow Muskrat | Drake Lab (conference room) | 172.18.244.94 | 22 | 3.8G | 2 | 0.8 | Intel |
| OSE- | CEID High Memory Machine | CEID 108 | 172.18.246.243 | 22 | ?G | ? | ? | ? |
| OSE- | CEID GPU Machine | CEID 108 | 172.18.247.135 | 22 | 128G | 6 | 3.6 | 2 x NVIDIA GTX 1080TI (11GB VRAM) 3584 CUDA cores |
The computer in the conference room is not recommended for intensive jobs. It runs a server so that files may be easily sent to it for viewing during meetings.
Windows users may connect to SSH servers using the venerable putty application, which is available for free download from the developer's website. The manual for putty is available here. Currently, to connect to any Drake Lab computers, it is necessary to use SSH keys for authentication. This page of the manual explains how to generate a key with putty. Regarding the choice of key type, any one that works with the SSH-2 protocol should be fine. Also please choose a strong passphrase for your key. If you will be using SSH frequently, you can avoid the need to type it in very often by using pageant. Once you have a public key, paste it in the appropriate place on the remote computer and you should be able to connect.
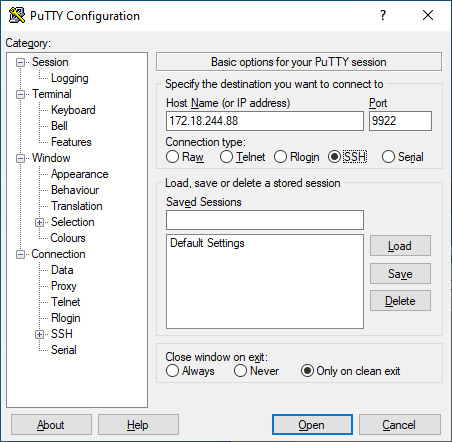
Example of putty session configuration for connecting to Silent Salamander:
You also need to configure Putty to use your private key:

Most Mac or Linux systems have an ssh client application installed, which has the name ssh. Often the manual is also installed and may be consulted by typing man ssh in a terminal. Many manuals are available on websites like this one. As is the case for many standard command-line applications, the manual is extensive and contains a wealth of useful information. However, basic use of the application requires only the simple command to connect to another computer. Here's the command to use to connect to one of the high-memory systems:
ssh -p 9922 [email protected]
The '-p 9922' is required only because the computer with IP address 172.18.244.88 currently has its SSH server running on the non-standard port of 9922. See the table above for a list of IP addresses and port numbers. After successfully running this in the terminal, you should obtain output such as the following.
 Welcome to Ubuntu 14.04.5 LTS (GNU/Linux 3.13.0-129-generic x86_64)

  * Documentation:  https://help.ubuntu.com/

 39 packages can be updated.
 35 updates are security updates.

 Last login: Mon Jun 11 09:03:23 2018 from 172.18.244.105
 username@OSE-WS148:~$
The cursor is then positioned at the prompt at the bottom and any commands typed there are run on the computer OSE-WS148, and can thus make use of rather a lot of memory. In order for you to connect to a computer in this way, one of your public SSH keys must be in the authorized_keys file of the user you which to connect as. If you do not have such a keyfile, you man easily generate one using ssh-keygen. Simply execute
ssh-keygen
in a terminal and follow the prompts. The default answers to all questions are usually reasonable if you are in doubt about what to choose. Please use a strong passphrase for your private key. You can avoid the need to type it very often by using ssh-agent. Usually, this boils down to typing
ssh-add
and then entering your passphrase so that your default private key is stored in the authentication agent.
After generating the keyfile, you may add it to authorized_keys in any number of ways, as discussed in this section.
If the computer that you want to connect from is not on UGA's campus, you will probably need to start a VPN session before you can connect to the Drake Lab computer. This is not difficult, but it does require a few minutes to set up. Instructions are available here. In addition to the officially supported Cisco AnyConnect client, the open-source OpenConnect client has also been found to work on Linux.
In some instances, users have needed to adjust their ssh command when using a computer off of the network. Specifically, sometimes you will need to specify the location of your key on your client computer and the use of IdentitiesOnly. This is most easily done by storing your ssh settings following the instructions on the Tear free help page
To be able to "SSH into" a computer, it must have an SSH server running on it. Installing such a server is easy on Ubuntu, which is the specific type of Linux found on most HPC systems in the Drake lab. The basic instructions are in the Ubuntu wiki here. Please give careful consideration to increasing the security above default levels. In particular, disabling password authentication and instead using SSH Keys is highly recommended. Setting up SSH keys, and many other administrative tasks, is easier when each user of the machine has their own user account. Creating such accounts can be done in about a minute with the adduser command. On a multi-user system, SSH access for each user can be controlled by whether the user's public keys is placed on a line of the file .ssh/authorized_keys within the user's home directory.
Have you set up an SSH server but are unable to connect from other computers? Make sure the firewall is configured to let SSH traffic in. Here's a guide to describing one way to do it.
If you've never used a terminal or a text editor before, this task may be a bit overwhelming for you. It may be a good idea to ask IT staff members or more experienced people you know for help.
Once a user has a public-private SSH key pair, to access the server the public key must be pasted into the file .ssh/authorized_keys within the user's home directory. Because remote login without a key is disabled, the user at this point may ask someone else who already has a key to connect and add the public key to the appropriate file. Alternatively, the user can email the file to herself, start a local session at the server's keyboard, and put the key file in place herself. If the new user creates the file .ssh/authorized_keys on the computer running the server herself, it may be necessary for her to adjust the file permissions for everything to work. The following commands should do the trick:
 chmod 600 ~/.ssh/authorized_keys
 chmod 700 ~/.ssh
Unfortunately, you may get sent a key in a non-standard format for entry into this file. The required format for the keys is given in the SSHD manual. In short, you must create a single line with three fields separated by a space. The first field is the key type, which should be one of the ones listed in the manual page. Currently, valid keytypes are "ecdsa-sha2-nistp256", "ecdsa-sha2-nistp384", "ecdsa-sha2-nistp521", "ssh-ed25519", "ssh-dss" or "ssh-rsa". Note that for ECDSA keys the size of the key must be known to choose the correct type. The second field is the long alpha-numeric string in the non-standard public key file, with all newlines removed. The final field is a comment, which is not used by the server. It is recommended to put the key owner's email here to help identify whose key it is, so that the correct line in .ssh/authorized_keys can be deleted when the owner leaves the lab, accidentally shares the matching private key, or the like.
If someone leaves the lab or otherwise has no need to access a computer remotely, it would be best to remove their public key from all authorized_keys files. There's no reason to needless increase the number of keys floating around that permit access to our lab's data and resources.