Misinfo Dashboard is a Next.js project bootstrapped with create-next-app.
Clone the caffiene-app repo to a directory on your local computer (ex. ~/username/sites/).
-
From the command line in your project root run:
git clone https://github.com/engagingnewsproject/caffeine-app.git
Node Version
At this time of writing (April 26, 2024) the latest working update is at Node v20.12.2. Ensure this is the version by running node -v. If you are not on that Node version check out this article to set the correct Node version: Easily switch between multiple Node versions without using nvm.
Yarn
Install/update yarn package manager on your machine (installation docs)
-
Enable Corepack, if it isn't already; this will add the
yarnbinary to your PATH:corepack enable -
Set the yarn version by running:
yarn set version 1.22.1 -
From the root of the project install dependencies by running:
yarn installWhy not
npm install? Glad you asked! Netlify, the service that hosts the dashboard, will not allow us to upload updates becausenpm installcreates apackage-lock.jsonfile. Netlify doesn't likepackage-lock.jsonfiles.
Then from the root of the project install dependencies by running:
yarn
In order to be authenticated with the Firebase Project you must have the .env file (which contains the Firebase credentials) at the root of your project. To get the contents of the .env file reach out to the project lead (currently Luke).
Firebase Emulator is included in the Firebase Tools package. You can install Firebase Tools by running:
curl -sL firebase.tools | bash
See Emulator Tips for more info.
- Start the development server.
yarn dev
This will boot up the Firebase Emulator and the NextJS server. Visit the localhost URL listed in your terminal to view your application.
If you open
http://localhost:3000and you see the "unhandled error"FirebaseError: Failed to get document because the client is offline.this means you have not started the Firebase Emulator. Return to step #4 to Install and run the Firebase Emulator.
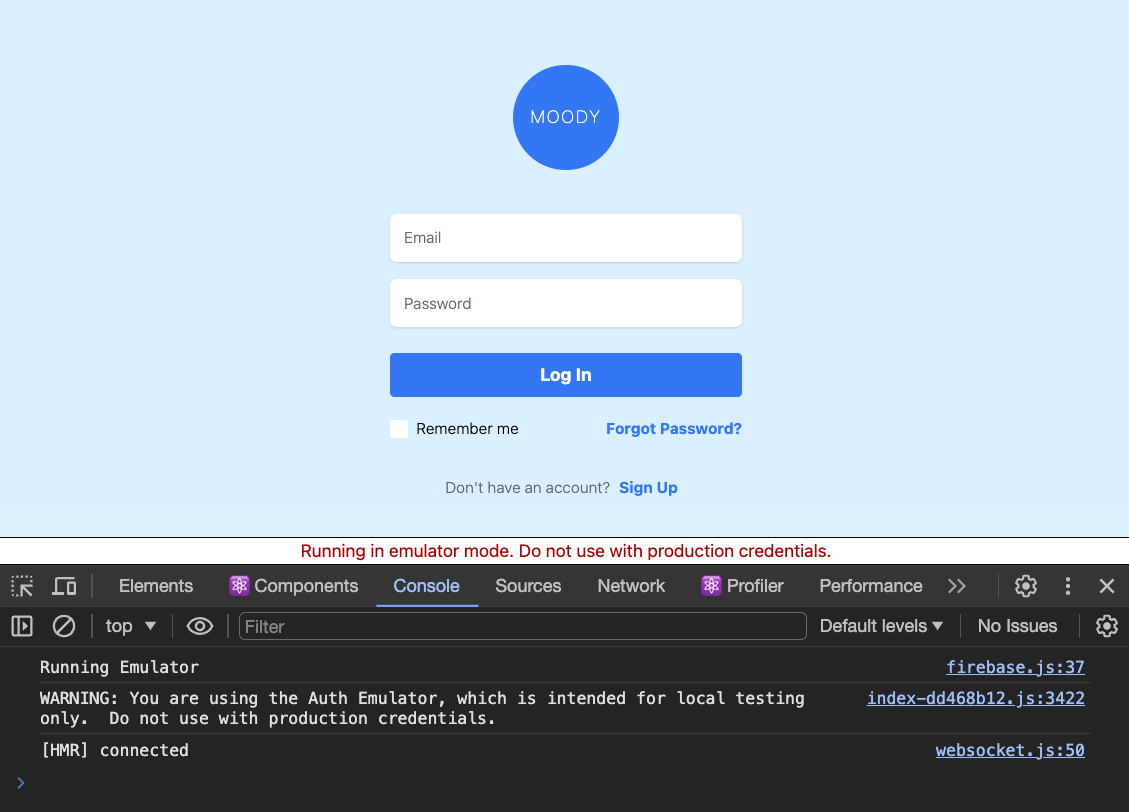
Open http://localhost:3000 with your browser to see the result. If you have the emulator running you will see a banner Running in emulator mode. Do not use with production credentials. at the bottom of your screen as well as Console log messages letting you know that the emulator is running:
NOTE: You will have 2 terminal tabs running while developing:
-
1 terminal tab for
yarn dev(ornpm run dev), -
1 terminal tab for
firebase emulators:start --import=./emulator-data.
NOTE: You will also have 2 browser tabs open while developing:
-
1 browser tab for
localhost:3000(actual caffeine-app dashboard), -
1 browser tab for "Firebase Emulator Suite"
Develop away! And good luck :)
If you get
command not foundyou might have to be added as a user for the Firebase project. Contact the lead developer to do this for you. Or contact [email protected]
The Firebase Emulator should boot up and provide you an emulator link (look for View Emulator UI at in your command line output).
Open that link to view the Emulator UI:
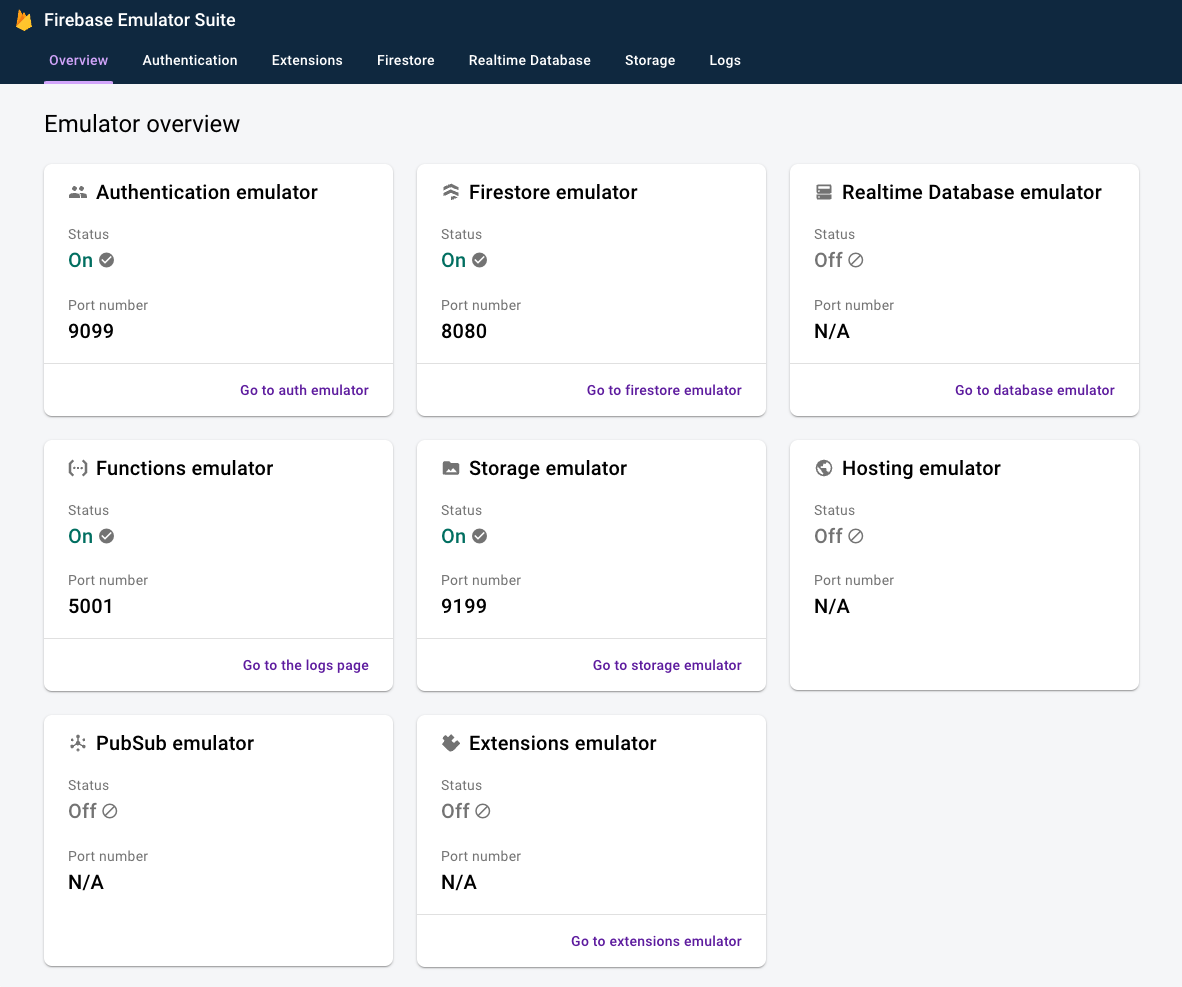
See Emulator Tips for more info.
-
Option one: Manually add yourself
From the Firebase Emulator UI select the "Emulator Authentication" tab and click "Add user". Only required fields are:
name,emailandpassword. Change your role? see Available user roles below. -
Option two: Sign up.
You can also signup like a normal user at the Login/Signup page. Once you have signed up:
- Open the link printed out in your Emulator terminal window.
- **all you need to do is open the link. Once you've opened the link close the tab and...
- Return to your initial Signup tab and login with the credentials you signed up with. Change your role? see Available user roles below.
- Open the link printed out in your Emulator terminal window.
-
General User:
No additional configuration required.
-
Agency User:
In the "Custom Claims" input enter
{"agency":true}& save. -
Admin User:
In the "Custom Claims" input enter
{"admin":true}& save.
- Database: find the imported database under the Emulator UI / Firestore tab.
- Users: view, add, edit & delete users under the Authentication tab.
- Files & Uploads: Storage tab in the Emulator UI.
Your user UID that you created will not be associated with any reports or agencies so you can either add reports via the Caffeine Dashboard in your localhost:3000 window or go into the Emulator UI and manually change the userID to your own for some reports. Same idea with assigning your user to an agency: go into the Emulator UI and add your email to an agency's agencyUsers field.
Emulator creates log files (firebase-debug.log & ui-debug.log) when you boot up the emulator. No need to push those with git.
The Firebase emulator allows you to export data from your running emulator instance. If you want to stash a baseline set of data, auth profiles you have set up in your running emulator instance.
firebase emulators:export ./emulator-data
This command will export the running emulator instance's auth profiles, firestore data and storage files to the /emulator-data folder. Recommended to not commit the /emulator-data changed files as to not alter the baseline Emulator data.
- Chrome extension that adds React debugging tools to the Chrome Developer Tools.
VS Code ES7+ React/Redux/React-Native snippets
- JavaScript and React/Redux snippets in ES7+ with Babel plugin features for VS Code
VS Code Tailwind CSS IntelliSense
- Tailwind CSS IntelliSense enhances the Tailwind development experience by providing Visual Studio Code users with advanced features such as autocomplete, syntax highlighting, and linting.
This section provides an overview of the file and folder structure of the Misin project. It covers top-level files and folders, configuration files, and routing conventions.
| Files | |
|---|---|
.eslintrc.json |
Configuration file for ESLint |
.firebaserc |
Firebase settings for deploy targets |
.gitignore |
Git files and folders to ignore |
firebase.json |
Firebase project configuration |
firestore.indexes.json |
Firebase custom indexes |
firestore.rules |
Firebase security rules |
next.config.js |
Configuration file for Next.js |
package.json |
Project npm dependencies and scripts |
postcss.config.json |
PostCSS configuration |
tailwind.config.js |
Tailwindcss configuration |
yarn.lock |
Project yarn dependencies and scripts |
| Files | |
|---|---|
/components |
Next.js components folder |
/config/firebase.js |
Firebase configuration folder |
/context/AuthContext.jsx |
Firebase authentication configuration folder. |
/pages |
Pages Router |
/public |
Static assets to be served |
/styles |
Tailwindcss global styles folder |
Data is stored on the Firebase Firestore Database.
- Database configuration is initialized in config/firebase.js.
- Database authentication (signup, login, logout ext.) is setup in context/AuthContext.jsx.
Firebase authentication on pages and components.
| Files: | |
|---|---|
config/firebase.js |
Auth entry point |
context/AuthContext.jsx |
defines user authorization |
pages/index.jsx - dashboard entry point, importing main dashboard (pages/dashboard.jsx)
| Files | |
|---|---|
components/Home.jsx |
imports dashboard elements: |
components/Headbar.jsx |
top title bar + search |
components/TagGraph.jsx |
tagging system. |
components/ReportsSection.jsx |
list of reports. |
components/Profile.jsx |
user profile view |
components/Settings.jsx |
tagging system settings |
components/Navbar.jsx |
side navbar component |
Graphs - view report trending topics components/ReportsSection.jsx - reports list.
Signup, login, logout & reset password.
| Files | |
|---|---|
pages/_app.js |
handles login functionality: |
components/ProtectedRoute.jsx |
login validation |
context/AuthContext.jsx |
authorization validation |
styles/globals.css |
global styles |
Includes Home view, Tagging System, New Report, Profile, Help & Login/Logout.
| Files | |
|---|---|
pages/dashboard.jsx |
renders side navbar |
components/Navbar.jsx |
imports navbar elements |
components/modals/ConfirmModal.jsx |
confirmation modal for logout |
components/modals/NewReportModal.jsx |
add new report modal |
components/modals/HelpModal.jsx |
dashboard help modal |
components/ReportsSection.jsx - the bulk of the report handling
- Filter reports - Filter the reports based on search text or filter dropdown selection
- Read/unread - Set report read status
- handleReadToggled, handleReadFilterChanged
- Infinite scroll - import InfiniteScroll from "react-infinite-scroll-component"
- Delete report
- handleReportDelete, handleDelete
components/modals/NewReportModal.jsx - new report modal component. Set new report key, value pairs:
| key | value |
|---|---|
userID |
user email |
state |
country-state-city package |
title |
report title |
link |
user input link |
secondLink |
user input second link |
images |
user uploaded images |
detail |
report description |
creationDate |
report created date |
isApproved |
?? |
read |
report viewed or toggled by user |
topic |
report selected label |
hearFrom |
Sources / Media |
Each report has specific tags applied. Topic Tags, Source Tags and Labels.
| Files | |
|---|---|
components/Settings.jsx |
tagging system entry point |
components/TagSystem.jsx |
import of tagging modals |
components/modals/NewTagModal.jsx |
modal for adding new tags |
components/modals/RenameTagModal.jsx |
modal for renaming existing tags |
components/modals/ConfirmModal.jsx |
modal for confirming tag changes |
Pie chart or line graph for the trending topics.
Determines graph of trending topics in the format of the selected graph view (either overview graph or comparison graph).
| Files | |
|---|---|
| components/Toggle.jsx | Allows user to switch between view of overgraph and comparison graph |
| components/TagGraph.jsx | gathers the needed information to display either the overview graph or comparison graph |
Pie chart that shows the number of reports for the top three trending topics for yesterday, the past three days, and the past week.
| Files | |
|---|---|
| components/OverviewGraph.jsx | Displays pie charts that show the number of reports for the top three trending topics within the provided timelines. |
Line chart that plots the number of reports for the selected topic reports within the requested date range.
| Files | |
|---|---|
| components/ComparisonGraphSetup.jsx | Modal popups that allow users to select the report topics and date range of which the number of reports should be collected. |
| components/ComparisonGraphPlotted.jsx | Line graph that displays the plotted number of reports for the selected report topics within the selected date range. |
| components/ComparisonGraphMenu.jsx | Menu bar that allows users to change parameters for the line chart and refresh the chart with the new selection. |
Redirects to default email client with link to the report
- Simple button that uses JS mailto function to share report through email
- Only shown on the details page of existing reports. Not related to other functions or pages in the system.
| Files |
|---|
pages/dashboard/reports/[reportId].jsx |
Allows users to create new reports through popup modal, not a separate page.
- Requires at least one: description, link, or photo
- Connects to firebase and generates a new report in the database
- Same functionality as the app, just for desktop
| Files |
|---|
components/modals/NewReportModal.jsx |
Switches between graph views
- Graph views use react charts library.
Bar graph that displays the number of reports from the previous day for the top 3 trending topics
- Can choose a specific date range as well.
Displays list of most recent reports in firebase.
| Files | |
|---|---|
ConfirmModal.jsx |
Used to display a dialog box with an optional message and two buttons, OK and Cancel. It prevents the user from accessing other parts of the page until the box is closed. |
HelpModal.jsx |
Used to display a dialog box with user documentation. |
NewReportModal.jsx |
|
NewTagModal.jsx |
|
RenameTagModal.jsx |
|
ReportModal.jsx |
|
UpdatePwModal.jsx |
A collection of general tips and rules of thumb when coding and building a project.
For example:
- will the change increase the weight of our page?
- will the change increase our load time?
Clever can be fun, but always at the risk of complicating things and making life more difficult for your future self and others. Opt for unglamorous, simple code to save yourself a headache down the road.
If being clever is going to save you a lot of time or be a big performance boost, be sure to put it in a very simple, well-documented standalone function or module with a simple name that clearly explains what it does, why it should be done this way, and how it works.
When writing a new function, make sure that it accomplishes one, specific thing. This keeps the code:
- more testable,
- easier to debug,
- easier to read / understand,
- easier to maintain
Some rules of thumb. You probably need to break apart your function into several smaller functions if:
- if you have a really long function name
- if your function code is many lines long or has many steps
This advice isn't in order to stop you from asking questions, but because some of the best learning happens when you think hard about trying to figure it out on your own. Google it. Read an article or two. Chances are you'll learn something, even if it doesn't lead you to the exact thing you needed to know.
- what you're trying to solve
- why you need to solve it
- what you've already tried
- helps you organize your thoughts
- gives you a chance to think about the problem in a different way
- often leads you to the correct answer
I'd estimate 30% of the time I've written a detailed question, I figure out the answer before I finish writing it or right after I ask it :)
When people have different format on save rules, it makes it really hard to review Pull Requests (PR). For example, if one person uses a two tab vs four spacing autoformat on save, the PR will show everyone of those lines from the file as a change rather than just the work that was completed. So, maybe you made one small change, but now every line in the file is shown as a change. This makes it difficult to identify the real change.
When writing a query or requesting data, it's best to get just what you need (or will likely need)
- Look at the existing code base and see if it makes sense for code to be in one place or another. If it doesn't have an obvious place, create a new file using the existing standards of the code.
Important things to remember:
-
Make sure you are always pulling from
main. -
Thorough testing after big changes. Deploy in a more piecemeal manner
-
Only one person to push to the
prodbranch.
After changes have been pushed to the Dev Site send a link to Kat for review.
-
When you take on a task:
-
Go to the applicable Github repo and choose the issue to work on
-
Assign this issue to yourself
-
Create your Git Branch
a. If this is a critical hotfix that needs to get released immediately:
$ git checkout -b hotfix-[hotfix-name] stable      // creates a local branch
$ git push origin hotfix-[hotfix-name]             // makes the branch remotely available
b. If this is a new feature/improvement:
$ git checkout -b feature-[feature-name] master    // creates a local branch
$ git push origin feature-[feature-name]           // makes the branch remotely available
c. If this is a non-critical bugfix:
$ git checkout -b bug-[bug-name] master // creates a local branch $ git push origin bug-[bug-name] // makes the branch remotely available -
As work gets to stable stopping points or completion, push it to github:
$ git push origin your-branch-name // pushes branch to github -
When your code is ready to be reviewed:
-
Go to your branch on github.com and create a new pull request to be merged into
main. -
Drop any implementation notes into the github.com issue and link the pull request to the github.com issue in the issue right sidebar.
-
-
After your code is reviewed:
- It will either be merged or comments will be left so you can finish up the issue. Go ahead and repeat from #1 while you wait for the review.
Quick Legend
| Instance | Branch | Description, Instructions, Notes |
| Development | dev | Accepts merges from Working, Features/Issues and Hotfixes. |
| Working | main | Accepts merges from Features/Issues and Hotfixes |
| Production | prod | Accepts merges from Working and Hotfixes |
The main repository will always hold two evergreen branches:
mainprod
The main branch should be considered origin/main and will be the main branch where the source code of HEADalways reflects a state with the latest delivered development changes for the next release. As a developer, you will be branching and merging from main.
Consider origin/prod to always represent the latest code deployed to production. During day to day development, the prod branch will not be interacted with.
When the source code in the main branch is stable and has been deployed, all of the changes will be merged into prod.
Supporting branches are used to aid parallel development between team members, ease tracking of features, and to assist in quickly fixing live production problems. Unlike the main branches, these branches always have a limited life time, since they will be removed eventually.
The different types of branches we may use are:
- Feature branches
- Bug branches
- Hotfix branches
Each of these branches have a specific purpose and are bound to strict rules as to which branches may be their originating branch and which branches must be their merge targets. Each branch and its usage is explained below.
Feature branches are used when developing a new feature or enhancement which has the potential of a development lifespan longer than a single deployment. When starting development, the deployment in which this feature will be released may not be known. No matter when the feature branch will be finished, it will always be merged back into the main branch.
During the lifespan of the feature development, the lead should watch the main branch (network tool or branch tool in GitHub) to see if there have been commits since the feature was branched. Any and all changes to main should be merged into the feature before merging back to main; this can be done at various times during the project or at the end, but time to handle merge conflicts should be accounted for.
- Must branch from:
main - Must merge back into:
main - Branch naming convention:
feature-[id]
If the branch does not exist yet (check with the Lead), create the branch locally and then push to GitHub. A feature branch should always be 'publicly' available. That is, development should never exist in just one developer's local branch.
$ git checkout -b feature-id master                 // creates a local branch for the new feature
$ git push origin feature-id                        // makes the new feature remotely available
Periodically, changes made to main (if any) should be merged back into your feature branch.
$ git merge main // merges changes from master into feature branch
When development on the feature is complete, the lead (or engineer in charge) should merge changes into main and then make sure the remote branch is deleted.
$ git checkout main                                 // change to the main branch
$ git merge --no-ff feature-id                      // makes sure to create a commit object during merge
$ git push origin main                              // push merge changes
$ git push origin :feature-id                       // deletes the remote branch
Bug branches differ from feature branches only semantically. Bug branches will be created when there is a bug on the live site that should be fixed and merged into the next deployment. For that reason, a bug branch typically will not last longer than one deployment cycle. Additionally, bug branches are used to explicitly track the difference between bug development and feature development. No matter when the bug branch will be finished, it will always be merged back into main.
Although likelihood will be less, during the lifespan of the bug development, the lead should watch the main branch (network tool or branch tool in GitHub) to see if there have been commits since the bug was branched. Any and all changes to main should be merged into the bug before merging back to main; this can be done at various times during the project or at the end, but time to handle merge conflicts should be accounted for.
- Must branch from:
main - Must merge back into:
main - Branch naming convention:
bug-[id]
If the branch does not exist yet (check with the Lead), create the branch locally and then push to GitHub. A bug branch should always be 'publicly' available. That is, development should never exist in just one developer's local branch.
$ git checkout -b bug-id main                       // creates a local branch for the new bug
$ git push origin bug-id                            // makes the new bug remotely available
Periodically, changes made to main (if any) should be merged back into your bug branch.
$ git merge main // merges changes from main into bug branch
When development on the bug is complete, [the Lead] should merge changes into main and then make sure the remote branch is deleted.
$ git checkout main                                 // change to the main branch
$ git merge --no-ff bug-id                          // makes sure to create a commit object during merge
$ git push origin main                              // push merge changes
$ git push origin :bug-id                           // deletes the remote branch
A hotfix branch comes from the need to act immediately upon an undesired state of a live production version. Additionally, because of the urgency, a hotfix is not required to be be pushed during a scheduled deployment. Due to these requirements, a hotfix branch is always branched from a tagged main branch. This is done for two reasons:
-
Development on the
mainbranch can continue while the hotfix is being addressed. -
A tagged
prodbranch still represents what is in production. At the point in time where a hotfix is needed, there could have been multiple commits tomainwhich would then no longer represent production. -
Must branch from: tagged
prod -
Must merge back into:
mainandprod -
Branch naming convention:
hotfix-[id]
If the branch does not exist yet (check with the Lead), create the branch locally and then push to GitHub. A hotfix branch should always be 'publicly' available. That is, development should never exist in just one developer's local branch.
$ git checkout -b hotfix-id main                    // creates a local branch for the new hotfix
$ git push origin hotfix-id                         // makes the new hotfix remotely available
When development on the hotfix is complete, [the Lead] should merge changes into prod and then update the tag.
$ git checkout main                                 // change to the main branch
$ git merge --no-ff hotfix-id                       // forces creation of commit object during merge
$ git tag -a <tag>                                  // tags the fix
$ git push origin main --tags                       // push tag changes
Merge changes into main so not to lose the hotfix and then delete the remote hotfix branch.
$ git checkout main                                 // change to the main branch
$ git merge --no-ff hotfix-id                       // forces creation of commit object during merge
$ git push origin main                              // push merge changes
$ git push origin :hotfix-id                        // deletes the remote branch
See where your local files are at
git status
Move to main branch
git checkout main
Pull from main
git pull origin main
Merge feature branch with main branch
git merge feature-slider-mobile-fix
Merge feature branch with dev branch
```
git checkout dev
git merge feature-slider-mobile-fix
```
Check your remote setup
git remote -v
Pull changes from main
git pull origin main
Add all files to commit
git add .
Set remote repository URL
git remote add origin https://github.com/engagingnewsproject/misinfo-dashboard.git
With proper permissions access Firebase Console or Firebase Cloud Console.
- Firebase project name: Caffeine App
- Firebase project ID: caffeine-app-d8cd8
- Firebase project #: 192976628738
- Firebase storage name: caffeine-app-d8cd8.appspot.com
Links: Chrome React Developer Tools || VS Code React-Native snippets || VS Code Tailwind CSS IntelliSense
Link: https://dev-caffeine-app.netlify.app/
To push all changes to the dev site on Netlify using the Engaging News Project's caffeine-app repo's dev branch.
The dev branch is the branch that contains the dev live site code.
-
Checkout the
devbranchgit checkout dev -
Merge changes from
maintodevgit marge main -
Push the merge into
devgit push origin dev -
Open the Netlify UI for the dev site and monitor the progress. Make sure the top bar has
dev-misinfo-dashboardactive. On the left sidebar navigate to the "Deploys" link. Your latest push will be listed at the top.
Link: https://misinfo-dashboard.netlify.app/
To push all changes to the live site on Netlify using the Engaging News Project's misinfo-dashboard repo's dev branch.
The prod branch is the branch that contains the live site code.
-
Checkout the
mainbranchgit checkout main -
Merge changes from
devintomaingit marge dev -
Push the merge into
maingit push origin main -
Checkout the
prodbranchgit checkout prod -
Merge
mainintoprodgit merge main -
Push the merge into
prodgit push origin prod -
Open the Netlify UI for the prod site and monitor the progress. Make sure the top bar has
misinfo-dashboardactive. On the left sidebar navigate to the "Deploys" link. Your latest push will be listed at the top.
If you get the below error you will need to install Git Large File Storage.
remote: error: File firestore-debug.log is 102.65 MB; this exceeds GitHub's file size limit of 100.00 MB
To install:
git lfs install - make sure git large file storage is installed
git lfs track "firestore-debug.log" - to track the large file
git lfs migrate import --include="firestore-debug.log" --everything - convert the file types to LFS
git lfs ls-files - to list files
git lfs checkout - files can be repopulated with their full expected contents lfs docs
Project Lead Links: Firebase CLI Tools || Firebase Console || Firebase Cloud Console || Syncing a fork || Netlify dashboard || ENP Prod Repo
- (all components in the left sidebar)
The AuthContext.jsx file in your React application interacts with the Firebase functions defined in functions/index.js through HTTPS callable functions. This setup allows your front-end application to communicate with the backend Firebase environment in a structured and secure manner.
-
Firebase Functions (
functions/index.js): This file defines various cloud functions that you deploy to Firebase. These functions can perform operations such as user authentication management (e.g., adding roles, fetching user data), interacting with Firebase Firestore, and other tasks that require server-side execution. -
React Context (
context/AuthContext.jsx): This file creates a React context that holds the user's authentication state and provides various authentication-related functions across your React application. It utilizes the functions defined infunctions/index.jsthrough HTTPS callable methods, such asaddAdminRole,addAgencyRole, andfetchUserRecord.- HTTPS Callable Functions: These are Firebase functions that are exposed via an HTTPS endpoint. In your React app, you use
httpsCallablefrom Firebase to invoke these functions. This method sends a POST request to the corresponding function's URL and gets the response.
- HTTPS Callable Functions: These are Firebase functions that are exposed via an HTTPS endpoint. In your React app, you use
-
Add Role: When you want to add a role to a user, your React component calls
addAdminRoleoraddAgencyRolethrough the context. This context function then calls the respective HTTPS callable function, which in turn invokes the cloud function in Firebase. The cloud function performs the necessary operations (like setting custom claims) and returns the result. -
Fetch User Record: When you need to fetch details about a user, your component accesses
fetchUserRecordfrom the context. This function usesgetUserRecord(defined as an HTTPS callable function) to retrieve user details from Firebase Authentication.
-
AuthContext Integration: In your React components, you use the context to perform operations that involve authentication or user management. For instance, upon user login, you might call
loginfrom the context, which handles the sign-in process using Firebase Authentication. -
Security and Accessibility: By managing these operations through cloud functions and context, you ensure that sensitive operations are securely handled on the server side, minimizing exposure to the client side, and you maintain a clean separation of concerns.