-
Notifications
You must be signed in to change notification settings - Fork 4.1k
[Term Entry] Python Pillow - Image: .frombuffer() #6441
New issue
Have a question about this project? Sign up for a free GitHub account to open an issue and contact its maintainers and the community.
By clicking “Sign up for GitHub”, you agree to our terms of service and privacy statement. We’ll occasionally send you account related emails.
Already on GitHub? Sign in to your account
Merged
Merged
Changes from all commits
Commits
Show all changes
5 commits
Select commit
Hold shift + click to select a range
4779c44
[Term Entry] Python Pillow - Image: .frombuffer()
mamtawardhani dabf027
Add files via upload
mamtawardhani 042dd22
fixed image links
mamtawardhani 83b5454
Update frombuffer.md
mamtawardhani 3b8c494
Merge branch 'main' into frombuffer
Radhika-okhade File filter
Filter by extension
Conversations
Failed to load comments.
Loading
Jump to
Jump to file
Failed to load files.
Loading
Diff view
Diff view
There are no files selected for viewing
150 changes: 150 additions & 0 deletions
150
content/pillow/concepts/image/terms/frombuffer/frombuffer.md
This file contains hidden or bidirectional Unicode text that may be interpreted or compiled differently than what appears below. To review, open the file in an editor that reveals hidden Unicode characters.
Learn more about bidirectional Unicode characters
| Original file line number | Diff line number | Diff line change |
|---|---|---|
| @@ -0,0 +1,150 @@ | ||
| --- | ||
| Title: '.frombuffer()' | ||
| Description: 'Creates an image memory from a bytes or buffer object containing raw pixel data.' | ||
| Subjects: | ||
| - 'Data Visualization' | ||
| - 'Data Science' | ||
| Tags: | ||
| - 'Data' | ||
| - 'Images' | ||
| - 'Libraries' | ||
| - 'Pillow' | ||
| CatalogContent: | ||
| - 'learn-python-3' | ||
| - 'paths/data-science' | ||
| --- | ||
|
|
||
| The **`.frombuffer()`** method in the Pillow Image module creates an image memory from a bytes or buffer object containing raw pixel data. It provides a powerful way to create Image objects directly from binary data without reading from a file. This method is particularly useful when working with image data generated in memory, data received from network connections, or when interfacing with other libraries that produce raw pixel data like NumPy arrays. | ||
|
|
||
| `.frombuffer()` enables efficient manipulation of image data by avoiding unnecessary file I/O operations, making it ideal for applications requiring high-performance image processing, computer vision tasks, or when generating images procedurally. | ||
|
|
||
| ## Syntax | ||
|
|
||
| ```pseudo | ||
| PIL.Image.frombuffer(mode, size, data, decoder_name='raw', *args) | ||
| ``` | ||
|
|
||
| **Parameters:** | ||
|
|
||
| - `mode`: The image mode. Common values include `'RGB'`, `'RGBA'`, `'L'` (for grayscale), etc. This defines how the bytes in the buffer should be interpreted. | ||
| - `size`: A tuple of `(width, height)` defining the dimensions of the image. | ||
| - `data`: A bytes or buffer object containing the raw pixel data. | ||
| - `decoder_name`: The decoder to use. Default is `'raw'`. | ||
| - `*args`: Additional arguments to pass to the decoder. | ||
|
|
||
| **Return value:** | ||
|
|
||
| The `.frombuffer()` method returns an `Image` object. | ||
|
|
||
| ## Example 1: Creating an Image from Raw RGB Data | ||
|
|
||
| This example demonstrates how to create an image from raw RGB pixel data stored in a bytes object. Each pixel requires 3 bytes (one for each color channel), so the total buffer size should match width × height × 3. Here is the code: | ||
|
|
||
| ```py | ||
| from PIL import Image | ||
| import numpy as np | ||
|
|
||
| # Create some sample data - a gradient from black to red | ||
| width, height = 256, 100 | ||
| data = bytearray() | ||
| for y in range(height): | ||
| for x in range(width): | ||
| # Red channel increases with x position | ||
| data.extend([x, 0, 0]) # R, G, B values | ||
|
|
||
| # Create image from the raw buffer data | ||
| image = Image.frombuffer('RGB', (width, height), bytes(data)) | ||
|
|
||
| # Save the result | ||
| image.save('red_gradient.png') | ||
| # Display the image | ||
| image.show() | ||
| ``` | ||
|
|
||
| It produces the output as follows: | ||
|
|
||
|  | ||
|
|
||
| This code generates an image with a horizontal gradient from black to red, demonstrating how to directly create an image from raw pixel data in memory. | ||
|
|
||
| ## Example 2: Converting NumPy Arrays to Pillow Images | ||
|
|
||
| This example shows a common real-world use case where `.frombuffer()` is used to efficiently convert a NumPy array to a Pillow Image without copying the underlying data: | ||
|
|
||
| ```py | ||
| from PIL import Image | ||
| import numpy as np | ||
|
|
||
| # Create a NumPy array with some image data | ||
| # Generate a gradient with NumPy (more efficient than the previous example) | ||
| width, height = 256, 100 | ||
| array = np.zeros((height, width, 3), dtype=np.uint8) | ||
| array[:, :, 0] = np.linspace(0, 255, width) # Red channel | ||
| array[:, :, 1] = np.linspace(0, 255, height)[:, np.newaxis] # Green channel | ||
|
|
||
| # Convert NumPy array to Pillow Image with frombuffer() | ||
| # Note: We need to ensure the array is contiguous in memory | ||
| if not array.flags.contiguous: | ||
| array = np.ascontiguousarray(array) | ||
|
|
||
| # Create image from buffer | ||
| image = Image.frombuffer('RGB', (width, height), array, 'raw', 'RGB', 0, 1) | ||
|
|
||
| # Save the result | ||
| image.save('numpy_gradient.png') | ||
| # Display the image | ||
| image.show() | ||
| ``` | ||
|
|
||
| It produces the output as follows: | ||
|
|
||
|  | ||
|
|
||
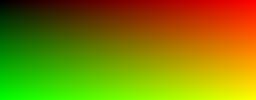
| This demonstrates how to convert a NumPy array to a Pillow Image efficiently, creating a gradient that transitions from black to yellow (combination of red and green channels). | ||
|
|
||
| ## Example 3: Processing Image Data from External Sources | ||
|
|
||
| This example illustrates how to use `.frombuffer()` when receiving raw image data from an external source, such as a web API or a binary file: | ||
|
|
||
| ```py | ||
| from PIL import Image | ||
| import requests | ||
| import io | ||
| import struct | ||
|
|
||
| # Function to read raw image data from a binary file | ||
| def read_raw_image(filename, width, height, mode='RGB'): | ||
| with open(filename, 'rb') as f: | ||
| raw_data = f.read() | ||
|
|
||
| # Create image from raw data | ||
| return Image.frombuffer(mode, (width, height), raw_data) | ||
|
|
||
| # Example: Generate a simple raw file with RGB data | ||
| def create_sample_raw_file(filename, width, height): | ||
| # Create a checkerboard pattern | ||
| with open(filename, 'wb') as f: | ||
| for y in range(height): | ||
| for x in range(width): | ||
| # Create a checkerboard pattern (black and white) | ||
| if (x + y) % 2 == 0: | ||
| f.write(struct.pack('BBB', 255, 255, 255)) # White pixel | ||
| else: | ||
| f.write(struct.pack('BBB', 0, 0, 0)) # Black pixel | ||
|
|
||
| # Create a sample raw file | ||
| width, height = 100, 100 | ||
| raw_filename = 'checkerboard.raw' | ||
| create_sample_raw_file(raw_filename, width, height) | ||
|
|
||
| # Read and display the raw image data | ||
| image = read_raw_image(raw_filename, width, height, 'RGB') | ||
| image.save('checkerboard.png') | ||
| image.show() | ||
| ``` | ||
|
|
||
| It produces the output as follows: | ||
|
|
||
|  | ||
|
|
||
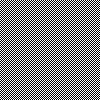
| This example demonstrates reading raw image data from a binary file, which is similar to processing raw image data received from external sources or hardware devices. | ||
Loading
Sorry, something went wrong. Reload?
Sorry, we cannot display this file.
Sorry, this file is invalid so it cannot be displayed.
Loading
Sorry, something went wrong. Reload?
Sorry, we cannot display this file.
Sorry, this file is invalid so it cannot be displayed.
Loading
Sorry, something went wrong. Reload?
Sorry, we cannot display this file.
Sorry, this file is invalid so it cannot be displayed.
Add this suggestion to a batch that can be applied as a single commit.
This suggestion is invalid because no changes were made to the code.
Suggestions cannot be applied while the pull request is closed.
Suggestions cannot be applied while viewing a subset of changes.
Only one suggestion per line can be applied in a batch.
Add this suggestion to a batch that can be applied as a single commit.
Applying suggestions on deleted lines is not supported.
You must change the existing code in this line in order to create a valid suggestion.
Outdated suggestions cannot be applied.
This suggestion has been applied or marked resolved.
Suggestions cannot be applied from pending reviews.
Suggestions cannot be applied on multi-line comments.
Suggestions cannot be applied while the pull request is queued to merge.
Suggestion cannot be applied right now. Please check back later.
There was a problem hiding this comment.
Choose a reason for hiding this comment
The reason will be displayed to describe this comment to others. Learn more.
Should "I" be capital in Image objects and Image module?