An Open Source and Simple Web Application Framework for ASP.NET Core Based on MicroServices
IDE : VSCode ( Installed extensions : ms-dotnettools.csharp, ms-azuretools.vscode-docker)
Done:
The project is being developed
- Asp.net core
- ORM : Entity Framework Core
- Object mapper : Automapper
- Errors Log Library : Log Elmah
- Authentication : ASP.NET Core Identity
- Authentication : JWT
- Real-time web functionality : ASP.NET Core SignalR
- Platform as a service (PaaS) - Container : Docker
- Orchestration Managing containers : Kubernetes
- Datbase : SQL Server (Always on)
- Deploy RabbitMQ on Kubernetes
- Traffic routing : NGINX Ingress Controller
- RPC framework : GRPC
- Sysnch Consume APIs : HTTP Client
- Message broker : RabbitMQ
- Datbase : PostgreSql
- Datbase : MongoDb
- Distributed Cache : Redis
- Command and Query : CQRS
- search and analytics engine : Elasticsearch
- IDL - Describing REST APIs : Swagger
- Deploy EasyTemplateCore on Kubernetes
- UnitTest : NUnit
- Integrated Test : xUnit
- Test API : Postman
- CI/CD : github Actions
- Image repository : Docker hub
- Cloud Services : AWS
Active ( Will have):
Localization
Globalization
(ASP.NET documentation)[https://docs.microsoft.com/en-us/aspnet/core/]
(Handle errors in ASP.NET Core)[https://docs.microsoft.com/en-us/aspnet/core/fundamentals/error-handling]
What is it?
EF Core is a modern object-database mapper for .NET. It supports LINQ queries, change tracking, updates, and schema migrations. EF Core works with SQL Server, Azure SQL Database, SQLite, Azure Cosmos DB, MySQL, PostgreSQL, and other databases through a provider plugin API.
Why we use it (Advantages, Disadvantage)?
EF Core can serve as an object-relational mapper (O/RM), which: Enables .NET developers to work with a database using .NET objects. Eliminates the need for most of the data-access code that typically needs to be written.
EF Core supports many database engines, see Database Providers for details.
How we use it? Getting Started with EF Core
To add your first migration, In web project folder, run the following command in VSCode Terminal or CMD:
dotnet ef migrations add InitialCreateWhat is it?
AutoMapper is a simple little library built to solve a deceptively complex problem - getting rid of code that mapped one object to another
Why should we use it (Advantages, Disadvantage)?
Mapping code is boring. Testing mapping code is even more boring. AutoMapper provides simple configuration of types, as well as simple testing of mappings. The real question may be “why use object-object mapping?” Mapping can occur in many places in an application, but mostly in the boundaries between layers, such as between the UI/Domain layers, or Service/Domain layers. Concerns of one layer often conflict with concerns in another, so object-object mapping leads to segregated models, where concerns for each layer can affect only types in that layer.
How can we use it? Getting Started Guide with AutoMapper
ASP.NET Core Example using AutoMapper
Overview of ASP.NET Core authentication
Introduction to Identity on ASP.NET Core
Migrate Authentication and Identity to ASP.NET Core
Two-factor authentication using SMS and email with ASP.NET Identity
Overview of ASP.NET Core authentication
Introduction to ASP.NET Core SignalR
Tutorial: Get started with ASP.NET Core SignalR
Download and install docker desktop:
1- Create a Dockerfile in solution folder.
# syntax=docker/dockerfile:1
FROM mcr.microsoft.com/dotnet/aspnet:5.0 AS base
WORKDIR /app
EXPOSE 80
EXPOSE 443

FROM mcr.microsoft.com/dotnet/sdk:5.0 AS build
WORKDIR /src

# Copy all csproj files and restore as distinct layers
COPY ["src/EasyTemplateCore.Web/EasyTemplateCore.Web.csproj", "src/EasyTemplateCore.Web/"]
COPY ["src/EasyTemplateCore.Services/EasyTemplateCore.Services.csproj", "src/EasyTemplateCore.Services/"]
COPY ["src/EasyTemplateCore.Data/EasyTemplateCore.Data.csproj", "src/EasyTemplateCore.Data/"]
COPY ["src/EasyTemplateCore.Entities/EasyTemplateCore.Entities.csproj", "src/EasyTemplateCore.Entities/"]
COPY ["src/EasyTemplateCore.Dtos/EasyTemplateCore.Dtos.csproj", "src/EasyTemplateCore.Dtos/"]
RUN dotnet restore "src/EasyTemplateCore.Web/EasyTemplateCore.Web.csproj"
COPY . .

# Build and Publish
WORKDIR "/src/src/EasyTemplateCore.Web"
RUN dotnet build "EasyTemplateCore.Web.csproj" -c Release -o /app/build

FROM build AS publish
RUN dotnet publish "EasyTemplateCore.Web.csproj" -c Release -o /app/publish

# Build runtime image
FROM base AS final
WORKDIR /app
COPY --from=publish /app/publish .
ENTRYPOINT ["dotnet", "EasyTemplateCore.Web.dll"]!If you want to use Kubernetes, just run step 2 and 3 in part " Use it from docker hub image "2- To Build the Docker Image, In solution folder, run the following command in VSCode Terminal or CMD:
- Don't forget to add . at the end of commanddocker build -t <Image name> .
# In this example :
docker build -t easytemplatecore .3- To Run the Docker Image :
From local image: run the following command in VSCode Terminal or CMD:
docker run -d -p 8080:80 easytemplatecore2- To Build the Docker Image, In solution folder, run the following command in VSCode Terminal or CMD:
docker build -t <your_username>/<Image name> .

# In this example :
docker build -t <your_username>/easytemplatecore .
3- Push the Docker image to Docker Hub:
docker push <your_username>/my-private-repo4- To Run the Docker Image :
From local image: run the following command in VSCode Terminal or CMD:
docker run -d -p 8080:80 <your_username>/easytemplatecore
Dockerize an ASP.NET Core application
GitHub Action CI/CD pipeline with Docker containers
To enable Kubernetes support and install a standalone instance of Kubernetes running as a Docker container, on Docker Dektop, go to Preferences > Kubernetes and then click Enable Kubernetes.
IMPORTANT If Kubernetes doesn't run, Edit your Hosts File, by these steps:
1- Open up the Hosts file using Notepad:
c:\windows\system32\drivers\etc\hosts
2- Add this line at the end of the file:
# To allow the same kube context to work on the host and the container:
127.0.0.1 kubernetes.docker.internal
# End of section
1- Run the following command:
kubectl apply -f https://raw.githubusercontent.com/kubernetes/dashboard/v2.3.1/aio/deploy/recommended.yaml2- To create sample user and a Service Account copy the following commands to new manifest file like kube-dashboard-adminuser.yaml and use kubectl apply -f kube-dashboard-adminuser.yaml command to create them.
apiVersion: v1
kind: ServiceAccount
metadata:
  name: admin-user
  namespace: kubernetes-dashboard
---
apiVersion: rbac.authorization.k8s.io/v1
kind: ClusterRoleBinding
metadata:
  name: admin-user
roleRef:
  apiGroup: rbac.authorization.k8s.io
  kind: ClusterRole
  name: cluster-admin
subjects:
- kind: ServiceAccount
  name: admin-user
  namespace: kubernetes-dashboard
3- Now we should find the secret. Execute following command to get the secret:
kubectl get secretsThe result should be somthing like :
| NAME | TYPE | DATA | AGE |
|---|---|---|---|
| default-token-dlgql | kubernetes.io/service-account-token | 3 | 37m |
4- Then, we need to find token we can use to log in. Execute following command to describe the secret:
kubectl describe secret default-token-dlgqlIt should print something like:
eyJhbGciOiJSUzI1NiIsImtpZCI6IkxVUlgzZVRwUkRQMHpOX25YWnZWRS1BUGIzR2hYZ3AwUlhWWEFJUXBfQTgifQ.eyJpc3MiOiJrdWJlcm5ldGVzL3NlcnZpY2VhY2NvdW50Iiwia3ViZXJuZXRlcy5pby9zZXJ2aWNlYWNjb3VudC9uYW1lc3BhY2UiOiJkZWZhdWx0Iiwia3ViZXJuZXRlcy5pby9zZXJ2aWNlYWNjb3VudC9zZWNyZXQubmFtZSI6ImRlZmF1bHQtdG9rZW4tZGxncWwiLCJrdWJlcm5ldGVzLmlvL3NlcnZpY2VhY2NvdW50L3NlcnZpY2UtYWNjb3VudC5uYW1lIjoiZGVmYXVsdCIsImt1YmVybmV0ZXMuaW8vc2VydmljZWFjY291bnQvc2VydmljZS1hY2NvdW50LnVpZCI6Ijg5NzU3YWJhLTkyMTEtNDAyMC1iNmI4LTkyNzllOTUzZTM3YSIsInN1YiI6InN5c3RlbTpzZXJ2aWNlYWNjb3VudDpkZWZhdWx0OmRlZmF1bHQifQ.AZG2ftPsjWXwIdkSmfyutgbwAWNjUuoyOcUNqC1HxpKFOA2s3oGna_y-N-l5m7jEExmg9oX1NWXEevAsR1uTc3SbC44whP_JoWPuZuM3N0CI1IJh3sPExnLz6RmW2ImaQ9PN_1pDM9s_ZjLM2ryOHQxBjEzVNwDEHo5SS8qFTFKZkLwhp0S8DfZMCPamAuTRF5zYvFPX2a1EadIuy6_ug7-1V1UW9BtIrzsDYMTLN3WhrvvzXZFbzJPaVUqhAae5DVm-aofrEuYL-iRBbKZ9vmpl3SC1qOl7P7yPm_hNOFNdV19JOvPvYWKWrHvojJnkFNOv62QeOoqkQRXEXv0aAA
Copy the token.
5- You can enable access to the Dashboard using the kubectl command-line tool, by running the following command:
kubectl proxy6- Kubectl will make Dashboard available at http://localhost:8001/api/v1/namespaces/kubernetes-dashboard/services/https:kubernetes-dashboard:/proxy/.
7- Now paste the token into Enter token field on the login screen.
Install and Set Up kubectl on Windows
Deploy and Access the Kubernetes Dashboard
Kubernetes Cluster On Windows Server Worker Nodes
Windows containers on Azure Kubernetes
Windows containers in Kubernetes
Guide for scheduling Windows containers in Kubernetes
1- To create Persistent Volume Claim copy the following commands to new manifest file like local-mssql-pvc.yaml and use kubectl apply -f local-mssql-pvc.yaml command to create them.
kind: PersistentVolumeClaim
apiVersion: v1
metadata:
  name: mssql2019-claim
spec:
  accessModes:
    - ReadWriteMany
  resources:
    requests:
      storage: 400Mi
To see kubernetes PersistentVolumeClaims:
kubectl get PersistentVolumeClaim

Or

kubectl get pvc
To see kubernetes storageclasses:
kubectl get storageclass
2- To create a secret in Kubernetes mssql2019 mssql that holds the value P@$$w0rd for the SA_MSSQL2019_PASSWORD, run the command:
kubectl create secret generic mssql2019 --from-literal=SA_MSSQL2019_PASSWORD="P@$$w0rd"IMPORTANT Replace P@$$w0rd with a complex password.
3- To create Deployment for mssql2019 and clusterip and access it from your windows copy the following commands to new manifest file like mssql-plat-depl.yaml and use kubectl apply -f mssql-plat-depl.yaml command to create them.
kind: Deployment
apiVersion: apps/v1
metadata:
  name: mssql2019-depl
spec:
  replicas: 1
  selector:
    matchLabels:
      app: mssql
  template:
    metadata:
      labels:
        app: mssql
    spec:
      containers:
        - name: mssql
          image: mcr.microsoft.com/mssql/server:2019-latest
          ports:
            - containerPort: 1433
          env:
          - name: MSSQL_PID
            value: "Express"
          - name: ACCEPT_EULA
            value: "Y"
          - name: SA_PASSWORD
            valueFrom:
              secretKeyRef:
                name: mssql2019
                key: SA_MSSQL2019_PASSWORD
          volumeMounts:
          - mountPath: /var/opt/mssql/data
            name: mssqldb
      volumes:
      - name: mssqldb
        persistentVolumeClaim:
          claimName: mssql2019-claim
---
kind: Service
apiVersion: v1
metadata:
  name: mssql2019-clusterip-srv
spec:
  type: ClusterIP
  selector:
    app: mssql
  ports:
  - name: mssql
    protocol: TCP
    port: 1433
    targetPort: 1433
---
kind: Service
apiVersion: v1
metadata:
  name: mssql2019-loadbalancer
spec:
  type: LoadBalancer
  selector:
    app: mssql
  ports:
  - protocol: TCP
    port: 1433
    targetPort: 1433
IMPORTANT Stop MSSQL on your machine, if you want to connect via SQL Server Management Studio
Create a PersistentVolumeClaim
Persistent Storage design document
Deploy a SQL Server container in Kubernetes
To create Deployment for RabbitMQ copy the following commands to new manifest file like rabbitmq-depl.yaml and use kubectl apply -f rabbitmq-depl.yaml command to create it.
kind: Deployment
apiVersion: apps/v1
metadata:
  name: rabbitmq-depl
spec:
  replicas: 1
  selector:
    matchLabels:
      app: rabbitmq
  template:
    metadata:
      labels:
        app: rabbitmq
    spec:
      containers:
        - name: rabbitmq
          image: rabbitmq:3-management
          ports:
            - containerPort: 15672
              name: rbmq-mgmt-port
            - containerPort: 5672
              name: rbmq-msg-port
---
kind: Service
apiVersion: v1
metadata:
  name: rabbitmq-clusterip-srv
spec:
  type: ClusterIP
  selector:
    app: rabbitmq
  ports:
  - name: rbmq-mgmt-port
    protocol: TCP
    port: 15672
    targetPort: 15672
  - name: rbmq-msg-port
    protocol: TCP
    port: 5672
    targetPort: 5672
---
kind: Service
apiVersion: v1
metadata:
  name: rabbitmq-loadbalancer
spec:
  type: LoadBalancer
  selector:
    app: rabbitmq
  ports:
  - name: rbmq-mgmt-port
    protocol: TCP
    port: 15672
    targetPort: 15672
  - name: rbmq-msg-port
    protocol: TCP
    port: 5672
targetPort: 5672Deploying RabbitMQ to Kubernetes
RabbitMQ Cluster Operator for Kubernetes
RabbitMQ Cluster Kubernetes Operator Quickstart
Installing RabbitMQ Cluster Operator in a Kubernetes Cluster
1- To install NGINX Ingress Controller on kubernetes, just run the following command:
kubectl apply -f https://raw.githubusercontent.com/kubernetes/ingress-nginx/controller-v1.0.3/deploy/static/provider/cloud/deploy.yaml
To see kubernetes namespaces:
kubectl get namespaces
To see kubernetes Ingress pods:
kubectl get pods --namespace=ingress-nginx
To see kubernetes Ingress services:
kubectl get services --namespace=ingress-nginx
2- Ingress-nginx could route traffic to 2 different HTTP backend services based on the path name. To achieve this, copy the following commands to new manifest file like ingress-srv.yaml and use kubectl apply -f ingress-srv.yaml.
apiVersion: networking.k8s.io/v1
kind: Ingress
metadata:
  name: ingress-srv
  annotations:
    kubernetes.io/ingress.class: nginx
    nginx.ingress.kubernetes.io/use-regex: 'true'
spec:
  rules:
    - host: "etc.example.com"
      http:
        paths:
          - path: /
            pathType: Prefix
            backend:
              service:
                name: easytemplatecore-clusterip-srv
                port:
                  number: 80
    - host: "www.example.com"
      http:
        paths:
          - path: /
            pathType: Prefix
            backend:
              service:
                name: lateralapp-clusterip-srv
                port:
number: 801- Open up the Host file using Notepad:
c:\windows\system32\drivers\etc\hosts
2- Add this line at the end of the file:
127.0.0.1 example.com
IMPORTANT Stop IIS on your machine to see example.com
Services, Load Balancing, and Networking on Ingress
NGINX Ingress Controller Installation Guide
NGINX Ingress Controller Basic usage - host based routing
How to Edit Your Hosts File on Windows, Mac, or Linux
MinIO offers high-performance, S3 compatible object storage. Native to Kubernetes, MinIO is the only object storage suite available on every public cloud, every Kubernetes distribution, the private cloud and the edge. MinIO is software-defined and is 100% open source under GNU AGPL v3.
Deploy MinIO Operator on Kubernetes
1-In Server App install package (EasyTemplateCore in this example):
Install-Package Grpc.AspNetCore2- Install this packages In client app (LateralApp in this example):
Install-Package Grpc.Net.Client

Install-Package Google.Protobuf

Install-Package Grpc.Tools
Tutorial: Create a gRPC client and server in ASP.NET Core
Create Protobuf messages for .NET apps
Troubleshoot gRPC on .NET Core
gRPC on .NET supported platforms
gRPC services with ASP.NET Core
Publish two different endpoints on Kestrel for two different endpoints on ASP.NET Core
Getting Started with ASP.NET Core and gRPC
Kestrel web server implementation in ASP.NET Core
Create a web API with ASP.NET Core
1-Copy the following commands to new manifest file like redis-config.yaml and use kubectl apply -f redis-config.yaml.
apiVersion: v1
kind: ConfigMap
metadata:
  name: etc-redis-config
data:
  redis-config: |
    maxmemory 200mb
    maxmemory-policy allkeys-lru
2-Copy the following commands to new manifest file like redis-depl.yaml and use kubectl apply -f redis-depl.yaml.
apiVersion: apps/v1
kind: Deployment
metadata:
  name: redis-depl
spec:
  replicas: 1
  selector:
    matchLabels:
      app: redis
  template:
    metadata:
      labels:
        app: redis
    spec:
      containers:
      - name: redis
        image: redis:6.2.6
        command:
          - redis-server
          - "/redis-master/redis.conf"
        env:
        - name: MASTER
          value: "true"
        ports:
        - containerPort: 6379
        resources:
          limits:
            cpu: "0.1"
        volumeMounts:
        - mountPath: /redis-master-data
          name: data
        - mountPath: /redis-master
          name: config
      volumes:
        - name: data
          emptyDir: {}
        - name: config
          configMap:
            name: etc-redis-config
            items:
            - key: redis-config
              path: redis.conf
---
kind: Service
apiVersion: v1
metadata:
  name: redis-clusterip-srv
spec:
  type: ClusterIP
  selector:
    app: redis
  ports:
  - name: redis
    protocol: TCP
    port: 6379
    targetPort: 6379
---
kind: Service
apiVersion: v1
metadata:
  name: redis-loadbalancer
spec:
  type: LoadBalancer
  selector:
    app: redis
  ports:
  - protocol: TCP
    port: 6379
targetPort: 6379Distributed caching in ASP.NET Core
Redis Enterprise Software on Kubernetes
Configuring Redis using a ConfigMap
Deploy Redis Enterprise Software on Kubernetes
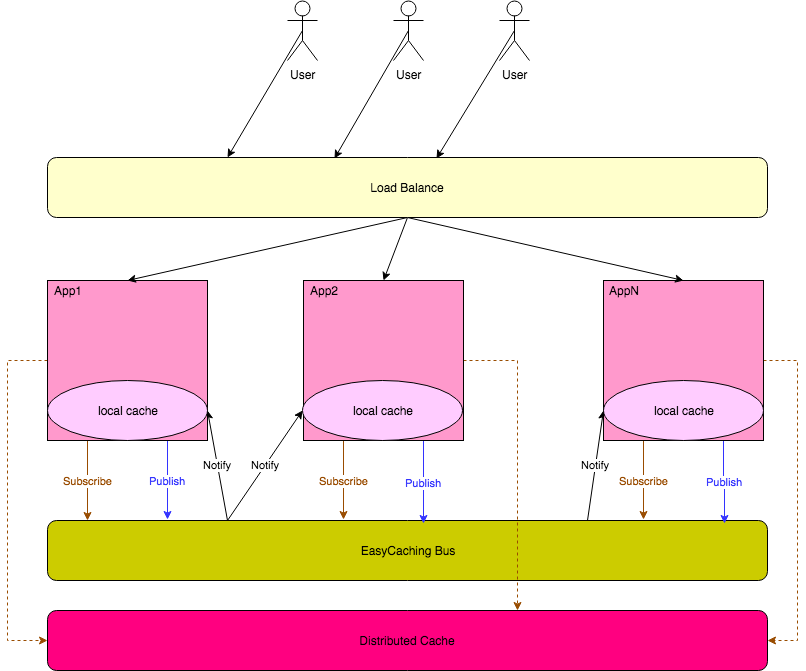
HybridCachingProvider will combine local caching and distributed caching together.
The most important problem that this caching provider solves is that it keeps the newest local cached value.
When we modify a cached value, the provider will send a message to 'EasyCaching' Bus so that it can notify other Apps to remove the old value.
The following image shows how it runs.
- Install the packages via Nuget
Install-Package EasyCaching.HybridCache
Install-Package EasyCaching.InMemory
Install-Package EasyCaching.Redis
Install-Package EasyCaching.Bus.Redis- Config in Startup class
public class Startup
{
    //...

    public void ConfigureServices(IServiceCollection services)
    {
        services.AddMvc();

        services.AddEasyCaching(option =>
        {
            // local
            option.UseInMemory("m1");
            // distributed
            option.UseRedis(config =>
            {
                config.DBConfig.Endpoints.Add(new Core.Configurations.ServerEndPoint("127.0.0.1", 6379));
                config.DBConfig.Database = 5;
            }, "myredis");

            // combine local and distributed
            option.UseHybrid(config =>
            {
                config.TopicName = "test-topic";
                config.EnableLogging = false;

                // specify the local cache provider name after v0.5.4
                config.LocalCacheProviderName = "m1";
                // specify the distributed cache provider name after v0.5.4
                config.DistributedCacheProviderName = "myredis";
            })
            // use redis bus
            .WithRedisBus(busConf =>
            {
                busConf.Endpoints.Add(new ServerEndPoint("127.0.0.1", 6380));
            });
        });
    }
}- Call IHybridCachingProvider
Following code shows how to use EasyCachingProvider in ASP.NET Core Web API.
[Route("api/[controller]")]
public class ValuesController : Controller
{
    private readonly IHybridCachingProvider _provider;

    public ValuesController(IHybridCachingProvider provider)
    {
        this._provider = provider;
    }

    [HttpGet]
    public string Get()
    {
        //Set
        _provider.Set("demo", "123", TimeSpan.FromMinutes(1));

        //others
        //...
    }
}ASP.NET Core web API documentation with Swagger / OpenAPI
To create Deployment for EasyTemplateCore copy the following commands to new manifest file like easytemplatecore-depl.yaml and use kubectl apply -f easytemplatecore-depl.yaml command to create it.
kind: Deployment
apiVersion: apps/v1
metadata:
  name: easytemplatecore-depl
spec:
  replicas: 3
  selector:
    matchLabels:
      app: easytemplatecore
  template:
    metadata:
      labels:
        app: easytemplatecore
    spec:
      containers:
        - name: easytemplatecore
          image: mohsen01/easytemplatecore:latest
---
kind: Service
apiVersion: v1
metadata:
  name: easytemplatecore-clusterip-srv
spec:
  type: ClusterIP
  selector:
    app: easytemplatecore
  ports:
  - name: easytemplatecore
    protocol: TCP
    port: 80
    targetPort: 80
  - name: easytemplatecoregrpc
    protocol: TCP
    port: 6000
targetPort: 6000Build ASP.NET Core applications deployed as Linux containers into an AKS/Kubernetes orchestrator
To create Deployment for LateralApp copy the following commands to new manifest file like lateralapp-depl.yaml and use kubectl apply -f lateralapp-depl.yaml command to create it.
kind: Deployment
apiVersion: apps/v1
metadata:
  name: lateralapp-depl
spec:
  replicas: 1
  selector:
    matchLabels:
      app: lateralapp
  template:
    metadata:
      labels:
        app: lateralapp
    spec:
      containers:
        - name: lateralapp
          image: mohsen01/lateralapp:latest
---
kind: Service
apiVersion: v1
metadata:
  name: lateralapp-clusterip-srv
spec:
  type: ClusterIP
  selector:
    app: lateralapp
  ports:
  - name: lateralapp
    protocol: TCP
    port: 80
targetPort: 80 Integration tests in ASP.NET Core
-Build & Test & Artifact
name: ASP.NET Core CI

on:
  push:
    branches: [ master ]
    paths-ignore:
      - 'readme.md'
  pull_request:
    branches: [ master ]
    paths-ignore:
      - 'readme.md'

jobs:
  build_and_test:
    if: contains(toJson(github.event.commits), '[SKIP CI]') == false
    runs-on: ubuntu-latest

    steps:
    - name: Dump GitHub Context
      env:
        GITHUB_CONTEXT: ${{ toJson(github) }}
      run: echo "$GITHUB_CONTEXT"

    - uses: actions/checkout@v2
    - name: Setup .NET
      uses: actions/setup-dotnet@v1
      with:
        dotnet-version: 5.0.x
    - name: where are we
      run: pwd
    - name: list some key files
      run: ls
    - name: Restore dependencies
      run: dotnet restore ./framework/
    - name: Build
      run: dotnet build --no-restore ./framework/ --configuration Release
    - name: Test
      run: dotnet test --no-build --verbosity normal ./framework/ --configuration Release

    - name: Upload Artifact
      uses: actions/upload-artifact@v2
      with:
        name: EasyTemplateCore
path: ./framework/src/EasyTemplateCore.Web/bin/ReleaseConfigure GitHub Actions to build Dockerfile
Using environments for deployment
How to use environment secret on github action?