If you are viewing this document from within Visual Studio Code, press CTRL+SHIFT+V to open a Markdown preview window.
This repository is dedicated to maintaining Visual Studio Code project files that integrate with Maxim Integrated's Microcontroller SDK. The following features are enabled by the project files:
- Code editing with intellisense and definition look-ups down to the register level
- Code compilation with the ability to easily re-target a project for different microcontrollers and boards
- Flashing program binaries
- GUI and command-line debugging
The project folders in this repo have the following dependencies:
-
Download & install the Maxim Microcontrollers SDK for your OS from the links below.
-
Run the installer executable.
-
During component selection, ensure that "Visual Studio Code Support" is selected.
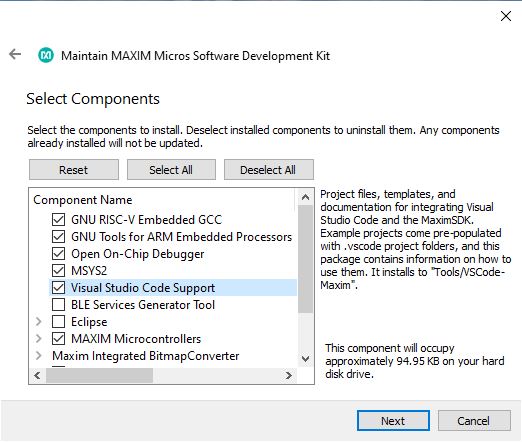
-
Finish the MaximSDK installation, and proceed to step 5 below to set up Visual Studio Code.
-
Download & install Visual Studio Code for your OS here.
-
Launch Visual Studio Code.
-
Install the Microsoft C/C++ extension.
-
Use
CTRL + SHIFT + P(orCOMMAND + SHIFT + Pon MacOS) to open the developer prompt. -
Type "open settings json" and select the "Preferences: Open Settings (JSON)" option (not the "Preferences: Open Default Settings (JSON)"). This will open your user settings.json file in VS Code's editor.

-
Add the entries below into your user settings.json file.
Note: If you installed the MaximSDK to a non-default location change the value of
"MAXIM_PATH". Only use forward slashes/when setting"MAXIM_PATH".{ // There may be other settings up here... "MAXIM_PATH":"C:/MaximSDK", "update.mode": "manual", "extensions.autoUpdate": false, // and/or other settings down here... } -
Save your changes to the file with
CTRL + Sand restart VS Code. -
That's it! You're ready to start using Visual Studio Code to develop with Maxim's Microcontrollers. The MaximSDK examples come pre-populated with .vscode project folders, and the
Tools/VSCode-Maximfolder of the SDK contains documentation and templates. See Usage below for more details.
This section covers basic usage of the VSCode-Maxim project files. For documentation on Visual Studio Code itself, please refer to the official docs here.
Prior experience with Visual Studio Code is not required to understand this section or use the project files, but some basic familiarity is helpful. For new users, this initial familiarity can be gained by working through the full User Guide.
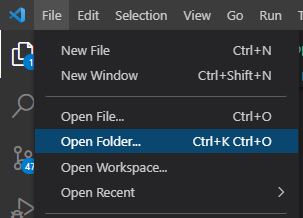
Visual Studio Code is built around a "working directory" paradigm. VS Code's editor is always running from inside of a working directory, and the main mechanism for changing that directory is File -> Open Folder...
VS Code will look in the opened folder for a .vscode sub-folder to load project-specific settings from.
Opening an existing project is as simple as File -> Open Folder.... A project that is configured for VS Code will have, at minimum, a .vscode sub-folder and a Makefile in its directory. Ex:
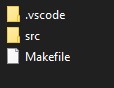
Note: You may need to enable viewing of hidden items in your file explorer to see the .vscode sub-folder.
Once a project is opened 4 available build tasks will become available via Terminal > Run Build task... or the shortcut Ctrl+Shift+B. These tasks are configured by the .vscode/task.json file.

-
Build
- Compiles the code.
- The
./builddirectory will be created and will contain the output binary, as well as all intermediary object files.
-
Clean
- This task cleans the build output, removing the
./builddirectory and all of its contents.
- This task cleans the build output, removing the
-
Clean-Periph
- This task is the same as 'clean', but it also removes the build output for Maxim's peripheral drivers.
- Use this if you would like to recompile the peripheral drivers from source on the next build.
-
Flash
- This task runs the Build task, and then flashes the output binary to the microcontroller.
- A debugger must be connected to the correct debugger port on the target microcontroller. Refer to the datasheet of your microcontrollers evaluation board for instructions on connecting a debugger.
At the heart of every project is its Makefile. Build Tasks are essentially a wrapper around the Makefile. Adding source code files to the build, setting compiler flags, linking libraries, etc. must be done by directly editing this file.
The usage guidelines below are specific to Maxim's Makefiles. The GNU Make Manual is a good one to have on hand for documentation regarding Makefiles in general.
- VS Code's editor can create and add new files to a project, but they won't be added to the build automatically. The Makefile must be told which source code files to build, and where to find them.
- Add a source file to the build with
SRCS += yourfile.c - The Makefile looks for project source files in the
/srcdirectory by default. Add additional directories to search withVPATH += yoursourcedirectory - The Makefile looks for project header files in the
/srcdirectory by default. Add additional directories to search withIPATH += yourincludedirectory
- Compiler flags can be added/changed via the
PROJ_CFLAGSvariable. - Add a new flag to be passed to the compiler with
PROJ_CFLAGS += -yourflag. Flags are passed in the order that they are added to thePROJ_CFLAGSvariable.
- Additional libraries can be linked via the
PROJ_LIBSvariable. Add a new library to the build withPROJ_LIBS += yourlibraryname.- Note : Do not include the 'lib' part of the library name, or the file extension. For example, to link
libarm_cortexM4lf_math.asetPROJ_LIBS += arm_cortexM4lf_math.
- Note : Do not include the 'lib' part of the library name, or the file extension. For example, to link
- Tell the linker where to find the library with the '-L' linker flag. Set
PROJ_LDFLAGS += -Lpathtoyourlibrary. For example, setPROJ_LDFLAGS += -L./libto search a 'lib' directory inside of the project for libraries.
- The optimization level that the compiler uses can be set by changing the
MXC_OPTIMIZE_CFLAGSvariable. - See GCC Optimization Options for more details on available optimization levels. For example, disable optimization with
MXC_OPTIMIZE_CFLAGS = -O0
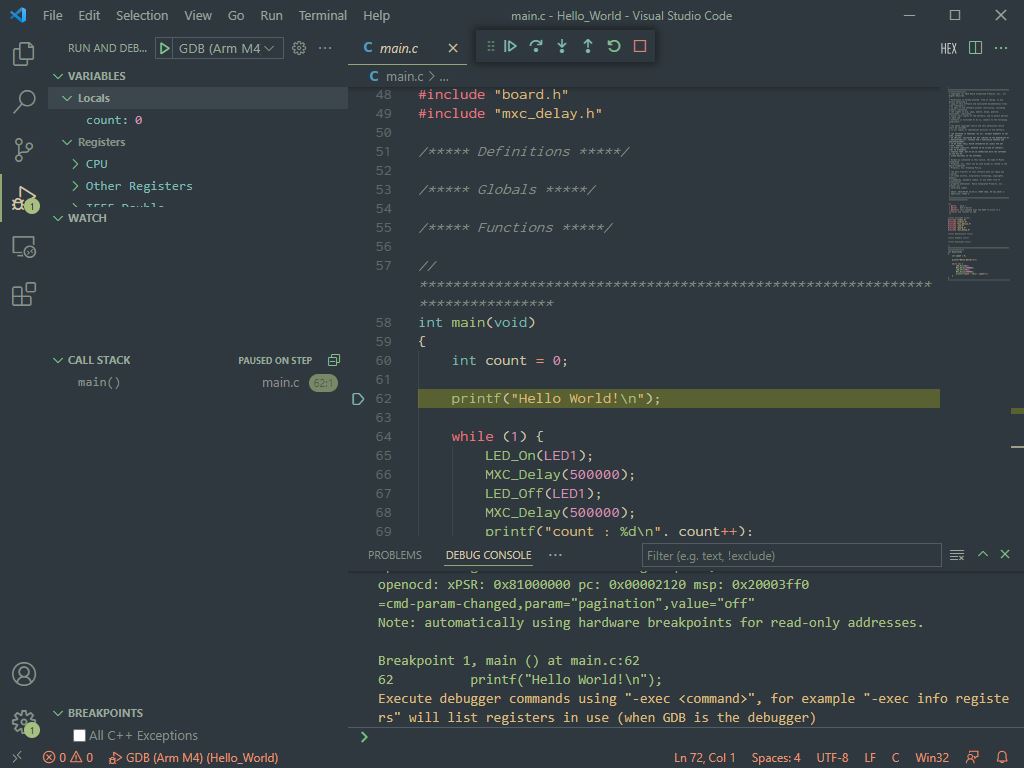
Debugging is enabled by Visual Studio Code's integrated debugger. Launch configurations are provided by the .vscode/launch.json file.
- Note: Flashing does not happen automatically when launching the debugger. Run the "Flash" build task for your program before debugging.
In general, Maxim's microcontrollers have the following debugger limitations at the hardware level:
-
The debugger can not be connected while the device is in reset.
-
The device can not be debugged while the device is in Sleep, Low Power Mode, Micro Power Mode, Standby, Backup, or Shutdown mode. These modes shut down the SWD clock.
-
Attach your debugger to the SWD port on the target microcontroller. (Refer to the datasheet of your evaluation board for instructions on connecting a debugger)
-
Flash the program to the microcontroller with the "Flash" Build Task. Flashing does not happen automatically when launching the debugger.
-
Launch the debugger with
Run > Start Debugging, with the shortcutF5, or via theRun and Debugwindow (Ctrl + Shift + D) and the green "launch" arrow.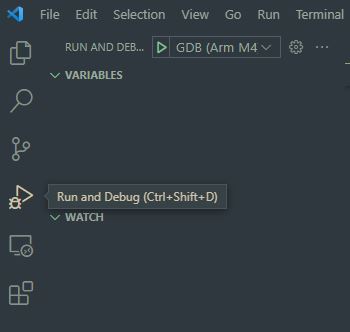
-
The debugger will launch a GDB client & OpenOCD server, reset the microcontroller, and should break on entry into
main.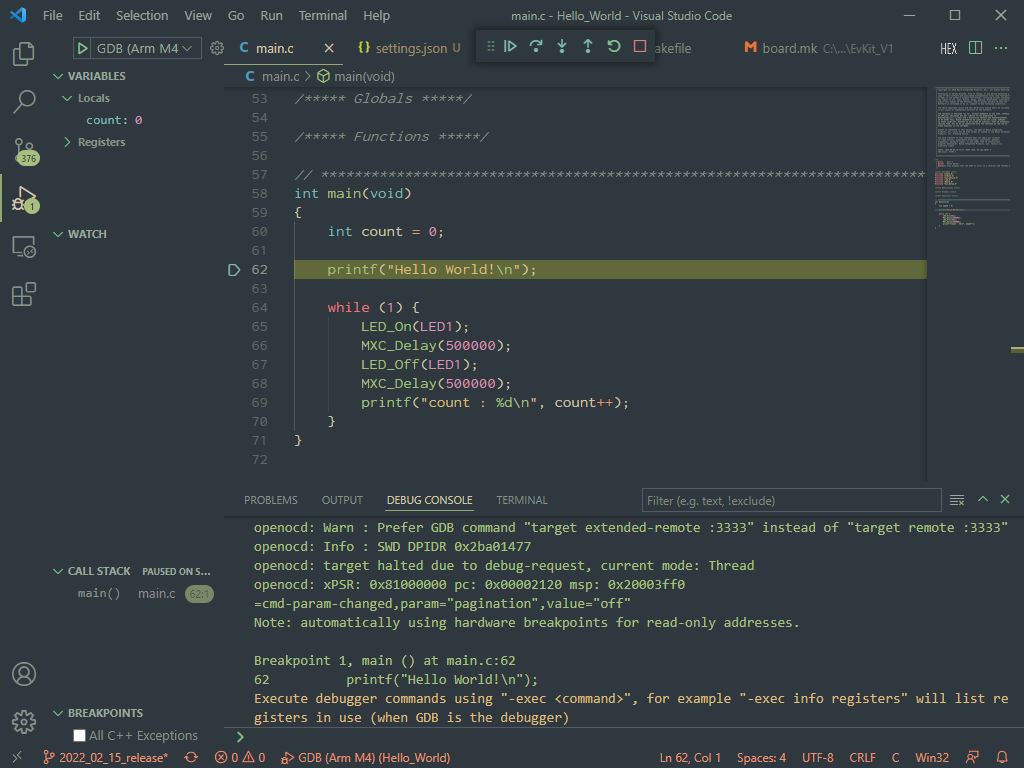
- For full usage details, please refer to the official VS Code debugger documentation.
The main interface for the debugger is the debugger control bar:
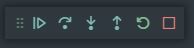
Continue | Step Over | Step Into | Step Out | Restart | Stop
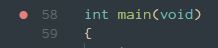
Breakpoints can be set by clicking in the space next to the line number in a source code file. A red dot indicates a line to break on. Breakpoints can be removed by clicking on them again. Ex:
For microcontrollers with both an Arm M4 and a RISC-V core, the "GDB (RISC-V)" launch profile is provided to enable RISC-V debugging. The RISC-V core requires setup and handoff from the Arm M4 core. As a result, this is an advanced configuration requiring a unique combination of the project's source code, Makefiles, and VSCode-Maxim project settings. Such projects are appended with the "-riscv" suffix in the project's folder name.
To debug a RISC-V project:
-
Connect your Arm (SWD) and RISC-V (JTAG) debuggers. The RISC-V projects come pre-configured for the ARM-USB-OCD-H + ARM-JTAG-20-10 adapter.
-
Make sure your Olimex debugger drivers are installed correctly. Sometimes they need to be updated using the "zadig" tool. See this Olimex User Manual for more details.
-
Run the "Flash" task. Ex:
-
Launch the debugger using the GDB (Arm M4) profile first:

... which should hit the breakpoint in
main.c...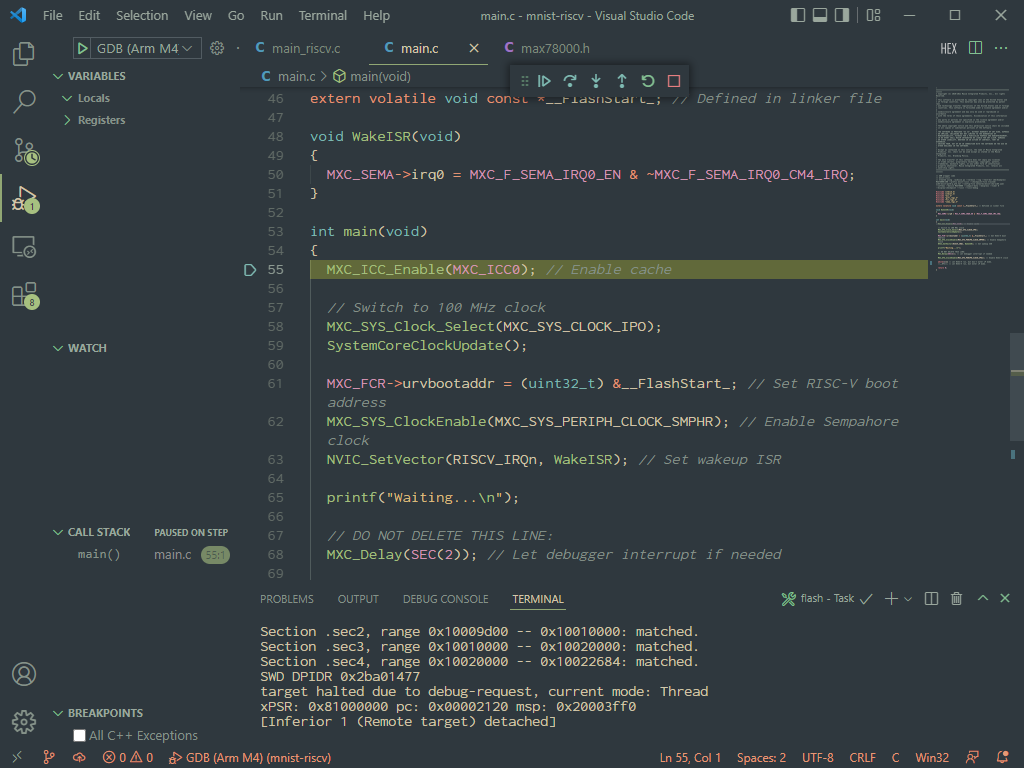
-
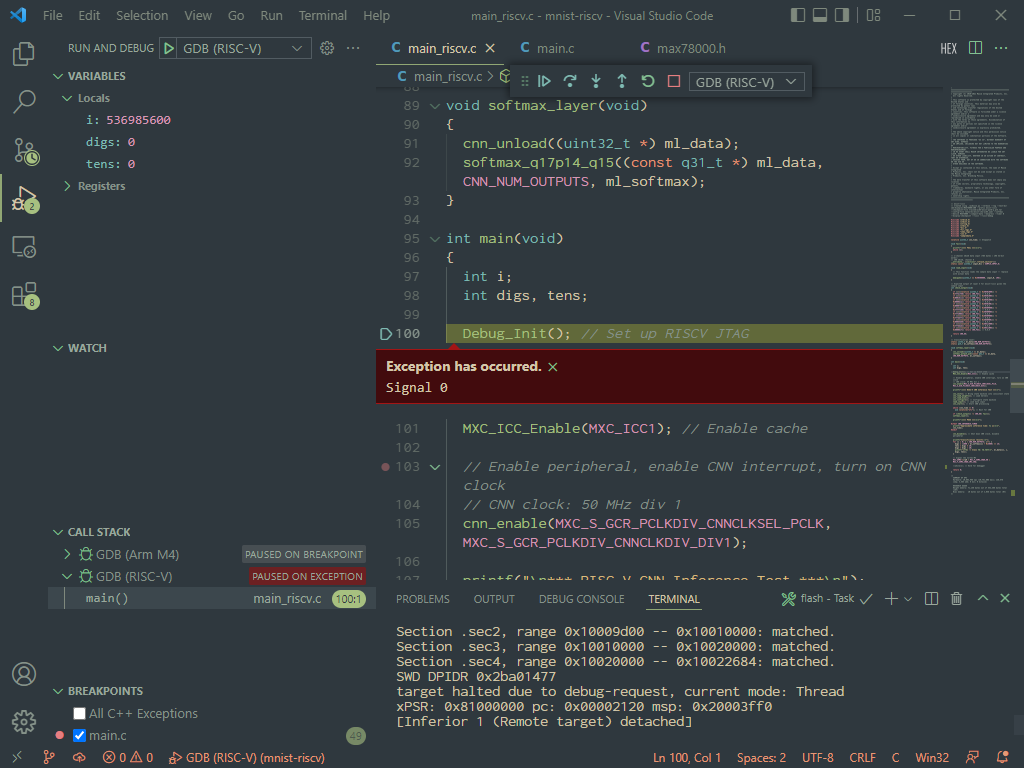
Continue the debugger. The code in
main.cwill boot up the RISC-V core. You can optionally set a breakpoint onWakeISRto see when the RISC-V core has signaled it's ready.
-
Now, launch another debugger window with the GDB (RISC-V) profile.

... which should hit the breakpoint on main.
Notice the "Signal 0" exception below... This is a known issue caused by a reset hardware bug on the RISC-V core that can be safely ignored. The exception message is harmless, but annoying... It will present itself every time the debugger is paused.
-
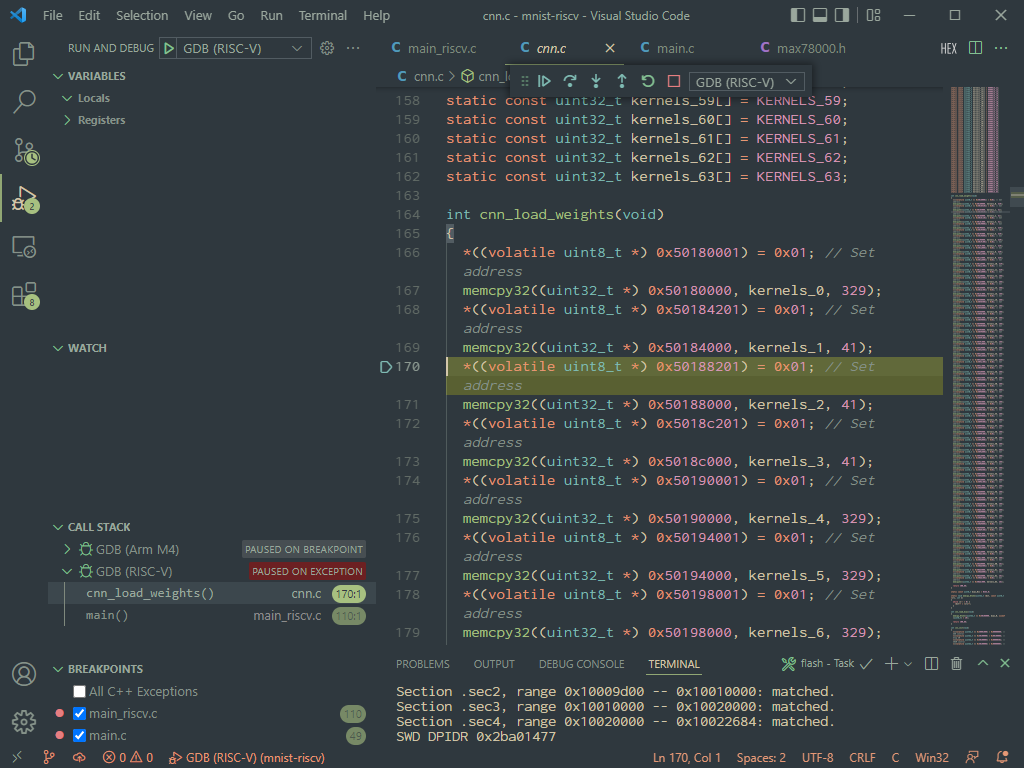
From here, the debugger should be fully functional. Ex, stepping through loading CNN weights on the MAX78000 RISC-V core:
.vscode/settings.json is the main project configuration file. Values set here are parsed into the other .json config files.
When a change is made to this file, VS Code should be reloaded with CTRL+SHIFT+P -> Reload Window (or alternatively restarted completely) to force a re-parse.

The default project configuration should work for most use cases as long as "target" and "board" are set correctly.
Any field from settings.json can be referenced from any other config file (including itself) with "${config:[fieldname]}"
The following configuration options are available:
-
"target"- This sets the target microcontroller for the project.
- Supported values:
"MAX32520""MAX32570""MAX32650""MAX32655""MAX32660""MAX32665"(for MAX32665-MAX32668)"MAX32670""MAX32672""MAX32675""MAX78000"
-
"board"-
This sets the target board for the project (ie. Evaluation Kit, Feather board, etc.)
-
Supported values:
- ... can be found in the
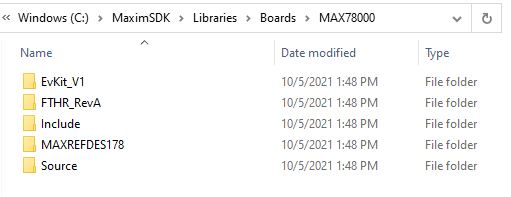
Libraries/Boardsfolder of the MaximSDK - For example, the supported options for the MAX78000 are
"EvKit_V1","FTHR_RevA", and"MAXREFDES178".
- ... can be found in the
-
-
"MAXIM_PATH"- This option must point to the root installation directory of the MaximSDK.
- It should be placed in the global user settings.json file during first-time VSCode-Maxim setup. See Installation.
-
"terminal.integrated.env.[platform]:Path"- This prepends the location of toolchain binaries to the system
Pathused by VSCode's integrated terminal. - The Path is not sanitized by default, which means that the terminal inherits the system path.
- Don't touch unless you know what you're doing :)
- This prepends the location of toolchain binaries to the system
-
"project_name"- Sets the name of project. This is used in other config options such as
program_file. - Default value:
"${workspaceFolderBasename}"
- Sets the name of project. This is used in other config options such as
-
"program_file"- Sets the name of the file to flash and debug. This is provided in case it's needed, but for most use cases should be left at its default.
- File extension must be included.
- Default value:
"${config:project_name}.elf"
-
"symbol_file"- Sets the name of the file that GDB will load debug symbols from.
- File extension must be included.
- Default value:
"${config:program_file}"
-
"M4_OCD_interface_file"- Sets the OpenOCD interface file to use to connect to the Arm M4 core. This should match the debugger being used for the M4 core.
- The
MaximSDK/Tools/OpenOCD/scripts/interfacefolder is searched for the file specified by this setting. .cfgfile extension must be included.- Default value:
"cmsis-dap.cfg"
-
"M4_OCD_target_file"- Sets the OpenOCD target file to use for the Arm M4 core. This should match the target microcontroller.
.cfgfile extension must be included.- The
MaximSDK/Tools/OpenOCD/scripts/targetfolder is searched for the file specified by this setting. - Default value:
"${config:target}.cfg"
-
"RV_OCD_interface_file"- Sets the OpenOCD interface file to use to connect to the RISC-V core. This should match the debugger being used for the RISC-V core.
- The
MaximSDK/Tools/OpenOCD/scripts/interfacefolder is searched for the file specified by this setting. .cfgfile extension must be included.- Default value:
"ftdi/olimex-arm-usb-ocd-h.cfg"
-
"RV_OCD_target_file"- Sets the OpenOCD target file to use for the RISC-V core.
- The
MaximSDK/Tools/OpenOCD/scripts/targetfolder is searched for the file specified by this setting. .cfgfile extension must be included.- Default value:
"${config:target}_riscv.cfg"
-
"v_Arm_GCC"- Sets the version of the Arm Embedded GCC to use, including toolchain binaries and the standard library version.
- This gets parsed into
ARM_GCC_path. - Default value:
"10.3"
-
"v_xPack_GCC"- Sets the version of the xPack RISC-V GCC to use.
- This gets parsed into
xPack_GCC_path. - Default value:
"10.2.0-1.2"
-
"OCD_path"- Where to find the OpenOCD.
- Default value:
"${config:MAXIM_PATH}/Tools/OpenOCD"
-
"ARM_GCC_path"- Where to find the Arm Embedded GCC Toolchain.
- Default value:
"${config:MAXIM_PATH}/Tools/GNUTools/${config:v_Arm_GCC}"
-
"xPack_GCC_path"- Where to find the RISC-V GCC Toolchain.
- Default value:
"${config:MAXIM_PATH}/Tools/xPack/riscv-none-embed-gcc/${config:v_xPack_GCC}"
-
"Make_path"- Where to find Make binaries (only used on Windows)
- Default value:
"${config:MAXIM_PATH}/Tools/MSYS2/usr/bin"
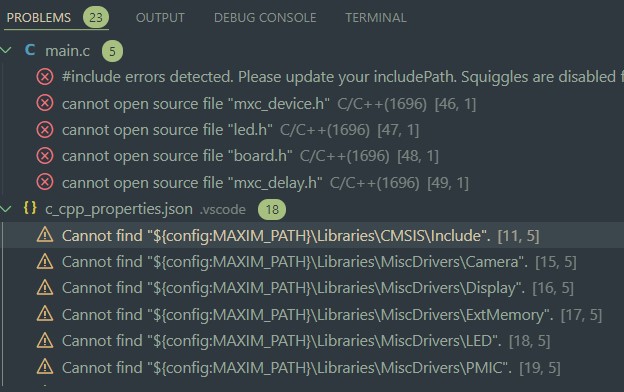
VS Code's intellisense engine must be told where to find the header files for your source code. By default, Maxim's perpiheral drivers, the C standard libraries, and all of the sub-directories of the workspace will be searched for header files to use with Intellisense. If VS Code throws an error on an #include statement (and the file exists), then a search path is most likely missing.
To add additional search paths :
-
Open the
.vscode/settings.jsonfile. -
Add the include path(s) to the
C_Cpp.default.includePathlist. The paths set here should contain header files, and will be searched by the Intellisense engine and when using "Go to Declaration" in the editor. -
Add the path(s) to any relevant implementation files to the
C_Cpp.default.browse.pathlist. This list contains the paths that will be searched when using "Go to Definition".
The MaximSDK's peripheral driver filenames are written using die types instead of external part numbers. This table shows which part numbers correspond to each die type, which is useful when browsing through source file definitions in Maxim's peripheral drivers.
| Die Type | Part Number |
|---|---|
| ES17 | MAX32520 |
| ME10 | MAX32650 |
| ME11 | MAX32660 |
| ME13 | MAX32570 |
| ME14 | MAX32665 |
| ME15 | MAX32670 |
| ME16 | MAX32675 |
| ME17 | MAX32655 |
| ME18 | MAX32690 |
| ME21 | MAX32672 |
| AI85 | MAX78000 |
| AI87 | MAX78002 |
Copying a pre-made example project is a great way to get rolling quickly, and is currently the recommended method for creating new projects.
The release package for this project (Located at Tools/VSCode-Maxim in the MaximSDK) contains a New_Project folder designed for such purposes. Additionally, any of the VS Code-enabled Example projects can be copied from the SDK.
-
Copy the existing project folder to an accessible location. This will be the location of your new project.
-
(Optional) Rename the folder. For example, I might rename the folder to
MyProject. -
Open the project in VS Code (
File -> Open Folder...) -
Set your target microcontroller and board correctly. See Basic Config Options
-
CTRL+SHIFT+P -> Reload Windowto re-parse the project settings. -
That's it! The existing project is ready to build, debug, and modify.
If you want to start from scratch, take this option.
-
Create your project folder. For example, I might create a new project in a workspace folder with the path:
C:\Users\Jake.Carter\workspace\MyNewProject. -
Copy the contents of the
Injectfolder into the project folder created in step 2. This includes a.vscodefolder and aMakefile. In the example above, the contents of the 'MyProject' folder would be the following :C:\Users\Jake.Carter\workspace\MyNewProject +-- \.vscode +-- Makefile
-
Open the project in VS Code (
File -> Open Folder...) -
Set your target microcontroller correctly. See Basic Config Options.
-
CTRL+SHIFT+P -> Reload Windowto re-parse the project settings. -
Fundamentally, that's it. Your new empty project can now be opened with
File > Open Folderfrom within VS Code. However, you'll probably want to add some source code. See Configuring the Makefile.
Before troubleshooting, ensure that you are using the project files from the latest VSCode-Maxim version, and that the version number of Visual Studio Code and the C/C++ extension match the release notes. Sometimes, issues are caused by VS Code auto-updates.
Additionally, ensure that your MaximSDK is updated to the latest version. You can use the "MaintenanceTool" application in the root directory of the SDK installation.
Opening a VSCode-Maxim project with File > Open Folder should make Maxim's toolchain accessible from the integrated terminal. To test that everything is working properly :
-
Navigate to the open
TERMINALtab on the bottom of the VS Code application. If a terminal is not open, you can open a new terminal withTerminal > New Terminalor (Ctrl+Shift+`).
-
The following commands to retrieve version numbers should be able to be run successfully from within the terminal :
make -vopenocd -varm-none-eabi-gcc -varm-none-eabi-gdb -v
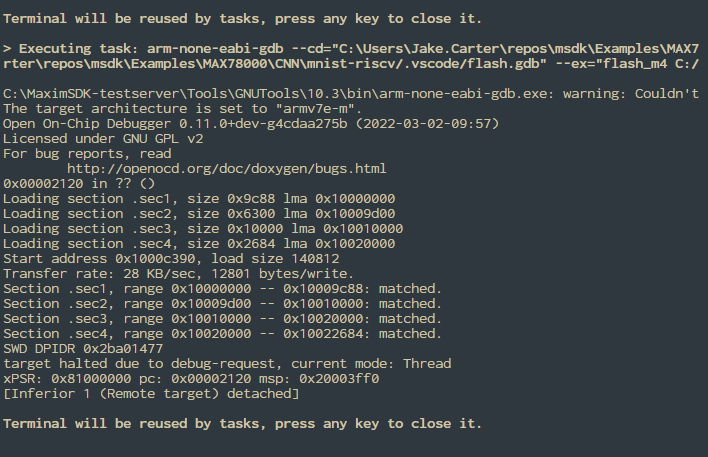
For example, the
make -vcommand should similar to the following: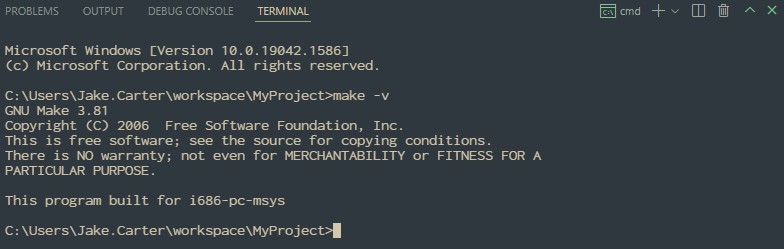
If the tools are not accessible from the terminal, then the system settings and/or project settings must be examined further. (Troubleshooting guide is in progress)
-
Large 'Problem' count when opening VS Code
-
"Unable to resolve configuration with compilerPath..."

The issues above are usually caused by a missing or improperly set "MAXIM_PATH" global settings.json variable.
If you see the issues below ensure that you have set "MAXIM_PATH" in your global user settings.json file, and that this path matches the location of the MaximSDK installation on your system.
This can be resolved by double checking that the Installation procedure has been followed exactly.
You can check the MAXIM_PATH on the VS Code terminal with the following commands...
(Windows cmd)
echo %MAXIM_PATH%(Windows powershell)
echo $env:MAXIM_PATH(Linux/MacOS)
printenv | grep MAXIM_PATH... which should print the exact location of the MaximSDK installation.
If you debugger is behaving strangely (which might consist of skipping code, throwing hard faults, failing to find function definitions, etc.) ensure that the program you're debugging matches the latest build output of the project. These symptoms are usually caused by a mismatch between the build output file and the contents of the micro's flash.
This issue is can usually be fixed by running the "Flash" build task. Remember - flashing does not happen automatically when launching the debugger.
Bug reports, feature requests, and contributions are welcome via the issues tracker on Github.
New issues should contain at minimum the following information:
- Visual Studio Code version #s (see
Help -> About) - C/C++ Extension version #
- Target microcontroller and evaluation platform
- The projects
.vscodefolder andMakefile(where applicable). Standard compression formats such as.zip,.rar,.tar.gz, etc. are all acceptable.