Clarifying the need of for zadig & flashing methods #46
There are no files selected for viewing
| Original file line number | Diff line number | Diff line change | |||||||||||||||||||||||||||||||||||||||||||||||||||||||||||||||||
|---|---|---|---|---|---|---|---|---|---|---|---|---|---|---|---|---|---|---|---|---|---|---|---|---|---|---|---|---|---|---|---|---|---|---|---|---|---|---|---|---|---|---|---|---|---|---|---|---|---|---|---|---|---|---|---|---|---|---|---|---|---|---|---|---|---|---|---|
| @@ -1,17 +1,39 @@ | |||||||||||||||||||||||||||||||||||||||||||||||||||||||||||||||||||
| ## Flashing your FrSky radio | |||||||||||||||||||||||||||||||||||||||||||||||||||||||||||||||||||
|
|
|||||||||||||||||||||||||||||||||||||||||||||||||||||||||||||||||||
| ### Are Additional Drivers Required? | |||||||||||||||||||||||||||||||||||||||||||||||||||||||||||||||||||
|
|
|||||||||||||||||||||||||||||||||||||||||||||||||||||||||||||||||||
| Most new transmitter such as the Taranis series do not require any additional drivers to be installed on the computer to use it with Companion for configuration and model editing. Flashing the remotes via PC (with dfu-util) needs drivers installed but this can be avoided by flashing with the bootloader. The exception is the FrSKY Horus X12S that, unlike the Taranis model, does not have a bootloader that allows flashing without additional drivers. Once flashed using the bootloader menu (described below) the bootloader is also updated and windows drivers will not be required for FrSKY transmitters except the Horus X12S. | |||||||||||||||||||||||||||||||||||||||||||||||||||||||||||||||||||
|
|
|||||||||||||||||||||||||||||||||||||||||||||||||||||||||||||||||||
| You do not need install these drivers unless you are sure you need it. | |||||||||||||||||||||||||||||||||||||||||||||||||||||||||||||||||||
|
|
|||||||||||||||||||||||||||||||||||||||||||||||||||||||||||||||||||
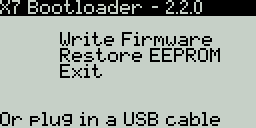
| To power up the transmitter in Bootloader mode: | |||||||||||||||||||||||||||||||||||||||||||||||||||||||||||||||||||
| * Power off the transmitter | |||||||||||||||||||||||||||||||||||||||||||||||||||||||||||||||||||
| * Pull the two horizontal trims towards the centre | |||||||||||||||||||||||||||||||||||||||||||||||||||||||||||||||||||
| * Power on the transmitter | |||||||||||||||||||||||||||||||||||||||||||||||||||||||||||||||||||
| * Release the trims | |||||||||||||||||||||||||||||||||||||||||||||||||||||||||||||||||||
| * Check the bootloader version number on the top line of the LCD screen | |||||||||||||||||||||||||||||||||||||||||||||||||||||||||||||||||||
|
|
|||||||||||||||||||||||||||||||||||||||||||||||||||||||||||||||||||
|  | |||||||||||||||||||||||||||||||||||||||||||||||||||||||||||||||||||
|
|
|||||||||||||||||||||||||||||||||||||||||||||||||||||||||||||||||||
|
|
|||||||||||||||||||||||||||||||||||||||||||||||||||||||||||||||||||
| | Tx | OpenTX Bootloader | Flash method | | |||||||||||||||||||||||||||||||||||||||||||||||||||||||||||||||||||
| | --- | ------------------- | ------ | | |||||||||||||||||||||||||||||||||||||||||||||||||||||||||||||||||||
| | X7 | 2.2 | Bootloader, Dfu-util | | |||||||||||||||||||||||||||||||||||||||||||||||||||||||||||||||||||
| | X9D | 1.x | Dfu-util | | |||||||||||||||||||||||||||||||||||||||||||||||||||||||||||||||||||
| | X9D | 2.x | Bootloader, Dfu-util | | |||||||||||||||||||||||||||||||||||||||||||||||||||||||||||||||||||
| | X9D+ | 2.x | Any | Bootloader, Dfu-util | | |||||||||||||||||||||||||||||||||||||||||||||||||||||||||||||||||||
| | X9E | 2.x | Any | Bootloader, Dfu-util | | |||||||||||||||||||||||||||||||||||||||||||||||||||||||||||||||||||
| | X12S | 2.2 + later | Dfu-util | | |||||||||||||||||||||||||||||||||||||||||||||||||||||||||||||||||||
|
|
|||||||||||||||||||||||||||||||||||||||||||||||||||||||||||||||||||
| Companion 2.2 for Mac and Windows comes with Dfu-util. Linux distribution usuall have a package for dfu-util. Windows needs drivers installed via Zadiag utility | |||||||||||||||||||||||||||||||||||||||||||||||||||||||||||||||||||
|
|
|||||||||||||||||||||||||||||||||||||||||||||||||||||||||||||||||||
|
|
|||||||||||||||||||||||||||||||||||||||||||||||||||||||||||||||||||
| ## Installing The Windows Driver with Zadiag (optional) | |||||||||||||||||||||||||||||||||||||||||||||||||||||||||||||||||||
|
|
|||||||||||||||||||||||||||||||||||||||||||||||||||||||||||||||||||
| The first thing to do is to power your radio off and connect it to your computer's USB port. | |||||||||||||||||||||||||||||||||||||||||||||||||||||||||||||||||||
|
|
|||||||||||||||||||||||||||||||||||||||||||||||||||||||||||||||||||
| For flashing a | |||||||||||||||||||||||||||||||||||||||||||||||||||||||||||||||||||
| Horus TX or if you need to recover your Taranis, you will need to install these drivers. | |||||||||||||||||||||||||||||||||||||||||||||||||||||||||||||||||||
|
|
|||||||||||||||||||||||||||||||||||||||||||||||||||||||||||||||||||
| Installing the driver is only required the first time you flash your | |||||||||||||||||||||||||||||||||||||||||||||||||||||||||||||||||||
| radio on a given computer. If already done this step, you can skip | |||||||||||||||||||||||||||||||||||||||||||||||||||||||||||||||||||
|
|
@@ -41,43 +63,77 @@ Zadig will install the driver, and should report success. When done you can dism | ||||||||||||||||||||||||||||||||||||||||||||||||||||||||||||||||||
| Should none of these options work, you can download the driver here and install it manually \(instructions are on the download page\). | |||||||||||||||||||||||||||||||||||||||||||||||||||||||||||||||||||
| When the driver is properly installed, you should see this in the device manager: | |||||||||||||||||||||||||||||||||||||||||||||||||||||||||||||||||||
|
|
|||||||||||||||||||||||||||||||||||||||||||||||||||||||||||||||||||
| ### Installing The Linux Flashing Utility | |||||||||||||||||||||||||||||||||||||||||||||||||||||||||||||||||||
|
|
|||||||||||||||||||||||||||||||||||||||||||||||||||||||||||||||||||
| Dfu-util is avaialble in most distributions. For example in Ubuntu it can be installed by | |||||||||||||||||||||||||||||||||||||||||||||||||||||||||||||||||||
|
|
|||||||||||||||||||||||||||||||||||||||||||||||||||||||||||||||||||
| ``` | |||||||||||||||||||||||||||||||||||||||||||||||||||||||||||||||||||
| sudo apt-get install dfu-util | |||||||||||||||||||||||||||||||||||||||||||||||||||||||||||||||||||
| ``` | |||||||||||||||||||||||||||||||||||||||||||||||||||||||||||||||||||
|
|
|||||||||||||||||||||||||||||||||||||||||||||||||||||||||||||||||||
| ### Flashing Using A Mac OS | |||||||||||||||||||||||||||||||||||||||||||||||||||||||||||||||||||
|
|
|||||||||||||||||||||||||||||||||||||||||||||||||||||||||||||||||||
| Companion for Mac OS already includes the required \`\`dfu-util'' tool | |||||||||||||||||||||||||||||||||||||||||||||||||||||||||||||||||||
| and does not require any additional installation of tools or drivers. | |||||||||||||||||||||||||||||||||||||||||||||||||||||||||||||||||||
|
|
|||||||||||||||||||||||||||||||||||||||||||||||||||||||||||||||||||
| ## Downloading The OpenTX Firmware | |||||||||||||||||||||||||||||||||||||||||||||||||||||||||||||||||||
|
|
|||||||||||||||||||||||||||||||||||||||||||||||||||||||||||||||||||
| The only recommended way to download the OpenTX firmware is using Companion. This process compiles/builds the firmware on the OpenTX servers and downloads a copy to the computer. | |||||||||||||||||||||||||||||||||||||||||||||||||||||||||||||||||||
|
|
|||||||||||||||||||||||||||||||||||||||||||||||||||||||||||||||||||
| To download the firmware follow these steps: | |||||||||||||||||||||||||||||||||||||||||||||||||||||||||||||||||||
|
|
|||||||||||||||||||||||||||||||||||||||||||||||||||||||||||||||||||
| * Radio Profile: Make sure the correct transmitter profile is selected | |||||||||||||||||||||||||||||||||||||||||||||||||||||||||||||||||||
| * Build Options: Make sure the build options selected are the ones you want | |||||||||||||||||||||||||||||||||||||||||||||||||||||||||||||||||||
| * Download Firmware: File -> Download | |||||||||||||||||||||||||||||||||||||||||||||||||||||||||||||||||||
| * Click on Download firmware (The download could take a few minutes) | |||||||||||||||||||||||||||||||||||||||||||||||||||||||||||||||||||
| * Save the firmware .bin file on the computer | |||||||||||||||||||||||||||||||||||||||||||||||||||||||||||||||||||
| * You may be prompted to write the firmware to the transmitter | |||||||||||||||||||||||||||||||||||||||||||||||||||||||||||||||||||
| * If you want to choose yes connect the transmitter to the computer in bootloader mode | |||||||||||||||||||||||||||||||||||||||||||||||||||||||||||||||||||
| * Click on Yes | |||||||||||||||||||||||||||||||||||||||||||||||||||||||||||||||||||
| * Select Check Hardware compatibility to make sure the firmware being written to the transmitter is for that particular hardware. | |||||||||||||||||||||||||||||||||||||||||||||||||||||||||||||||||||
| * Click on Write to TX | |||||||||||||||||||||||||||||||||||||||||||||||||||||||||||||||||||
| * Eject the mounted drives | |||||||||||||||||||||||||||||||||||||||||||||||||||||||||||||||||||
| * Disconnect the USB cable | |||||||||||||||||||||||||||||||||||||||||||||||||||||||||||||||||||
| * Power the transmitter off | |||||||||||||||||||||||||||||||||||||||||||||||||||||||||||||||||||
|
|
|||||||||||||||||||||||||||||||||||||||||||||||||||||||||||||||||||
| # Writing The OpenTX Firmware | |||||||||||||||||||||||||||||||||||||||||||||||||||||||||||||||||||
|
|
|||||||||||||||||||||||||||||||||||||||||||||||||||||||||||||||||||
| Connect the transmitter to the computer in bootloader mode. | |||||||||||||||||||||||||||||||||||||||||||||||||||||||||||||||||||
|
|
|||||||||||||||||||||||||||||||||||||||||||||||||||||||||||||||||||
| There are two options to write the firmware: | |||||||||||||||||||||||||||||||||||||||||||||||||||||||||||||||||||
| * Using The Bootloader Menu | |||||||||||||||||||||||||||||||||||||||||||||||||||||||||||||||||||
| * Using Companion | |||||||||||||||||||||||||||||||||||||||||||||||||||||||||||||||||||
|
|
|||||||||||||||||||||||||||||||||||||||||||||||||||||||||||||||||||
| ## Using The Bootloader Menu | |||||||||||||||||||||||||||||||||||||||||||||||||||||||||||||||||||
|
|
|||||||||||||||||||||||||||||||||||||||||||||||||||||||||||||||||||
| * Place a copy of the firmware on the sd card in the FIRMWARE folder | |||||||||||||||||||||||||||||||||||||||||||||||||||||||||||||||||||
| * Rename the firmware file so that the filename including the .bin extension is 35 characters or less. | |||||||||||||||||||||||||||||||||||||||||||||||||||||||||||||||||||
| * Eject the two mounted drives | |||||||||||||||||||||||||||||||||||||||||||||||||||||||||||||||||||
| * Disconnect the USB cable | |||||||||||||||||||||||||||||||||||||||||||||||||||||||||||||||||||
| * Choose Write Firmware from the bootloader menu | |||||||||||||||||||||||||||||||||||||||||||||||||||||||||||||||||||
| * Select the firmware to be written | |||||||||||||||||||||||||||||||||||||||||||||||||||||||||||||||||||
| * Press ENT | |||||||||||||||||||||||||||||||||||||||||||||||||||||||||||||||||||
| * Hold ENT down to start writing the firmware | |||||||||||||||||||||||||||||||||||||||||||||||||||||||||||||||||||
| * When the “Writing Complete” message is displayed press EXIT | |||||||||||||||||||||||||||||||||||||||||||||||||||||||||||||||||||
| * Power the transmitter off | |||||||||||||||||||||||||||||||||||||||||||||||||||||||||||||||||||
|
|
|||||||||||||||||||||||||||||||||||||||||||||||||||||||||||||||||||
| ## Using Companion (dfu-util) | |||||||||||||||||||||||||||||||||||||||||||||||||||||||||||||||||||
|
There was a problem hiding this comment. This section is wrong. In order for Companion to use dfu-util/zadig the radio has to be in STM Bootloader. So the radio has to be OFF and then connected to computer. What you describe below is also possible, using OpenTX Bootloader like you described above. But in this case dfu-util/zadig is not used. This method uses USB mass storage mode (that is implemented by the OpenTX Bootloader) so no special driver needed for this. There was a problem hiding this comment. I think the confusion is that we have writing firmware under the driver section... the writing firmware may be clearer if put in its own section... When I wrote the writing firmware instructions I wrote if for a majority audience of FrSKY Tx purchased today and going forward... well purchased within the last year... for this audience informaing them about dfu/zadig etc. is unnecessary and adds confusion... many users forst want to know how to do something and only want to know the why and underlying details later on out of curiosity or have problems... This section makes more sense when arranged as it is in this article Connecting The Transmitter In Bootloader Mode Most new transmitter such as the Taranis series do not require any additional software or drivers to be installed on the computer. One exception is the FrSKY Horus X12S which is covered here (link). So how do I remove this section from here while retaining the other edits that have passed? There was a problem hiding this comment. I've browsed trough your page (link above) and there instructions are much more clear. I agree that skipping whole dfu-util/zadig is a good thing. But on the other hand dfu-util/zadig has to be documented somewhere because it is needed for X12 and can be helpul/needed for X9D.
Just move the dfu-util/zadig to a separate section. There was a problem hiding this comment. Ahh... I went back up and noticed this table which is not how I wrote it....
I wrote is as below after gaining a consensus here
MAC Note: Companion 2.2 for Mac comes with Dfu-util. (Need some wording for linux?) The difference is
versus
I wrote the rest of the instructions in the context on how to get something done without the what is being used.... So should I just close this pull request? There was a problem hiding this comment. Your last table looks good. Still I hope you realize that for example a 9XE with 2.x can also be written with dfu-util. Perhaps your way of mentioning only no driver needed is more appropriate since it is less confusing to the user. But the fact is that all radios in the above table regardless of the OpenTX version installed support dfu-util/zadig method, just that some of them also support no driver needed method. |
|||||||||||||||||||||||||||||||||||||||||||||||||||||||||||||||||||
|
|
|||||||||||||||||||||||||||||||||||||||||||||||||||||||||||||||||||
| If you get an error about the dfu-util executable not | |||||||||||||||||||||||||||||||||||||||||||||||||||||||||||||||||||
| being found, open the flashing tool settings menu item. Browse for the dfu-util executable, which should be: On Windows: In the OpenTX companion installation folder \(by default\) | |||||||||||||||||||||||||||||||||||||||||||||||||||||||||||||||||||
| `C:\Program Files\OpenTX Companion 2.2\dfu-util.exe` on 32-bit systems, | |||||||||||||||||||||||||||||||||||||||||||||||||||||||||||||||||||
| and `C:\Program Files\OpenTX Companion 2.2\dfu-util.exe` on 64-bit | |||||||||||||||||||||||||||||||||||||||||||||||||||||||||||||||||||
| systems. On Mac OS: `/Applications/OpenTX Companion 2.2.app/Contents/Resources/dfu-util` | |||||||||||||||||||||||||||||||||||||||||||||||||||||||||||||||||||
|
|
|||||||||||||||||||||||||||||||||||||||||||||||||||||||||||||||||||
|
|
|||||||||||||||||||||||||||||||||||||||||||||||||||||||||||||||||||
| * Read/Write -> Write Firmware to Radio | |||||||||||||||||||||||||||||||||||||||||||||||||||||||||||||||||||
| * A Flash Firmware window appears | |||||||||||||||||||||||||||||||||||||||||||||||||||||||||||||||||||
| * Click on Load and select the firmware file downloaded using companion | |||||||||||||||||||||||||||||||||||||||||||||||||||||||||||||||||||
| * Select Check Hardware compatibility to make sure the firmware being written to the transmitter is the correct one | |||||||||||||||||||||||||||||||||||||||||||||||||||||||||||||||||||
| * Click on Write to TX | |||||||||||||||||||||||||||||||||||||||||||||||||||||||||||||||||||
| * Eject the two mounted drives | |||||||||||||||||||||||||||||||||||||||||||||||||||||||||||||||||||
| * Disconnect the USB cable | |||||||||||||||||||||||||||||||||||||||||||||||||||||||||||||||||||
| * Power off the transmitter | |||||||||||||||||||||||||||||||||||||||||||||||||||||||||||||||||||
|
|
|||||||||||||||||||||||||||||||||||||||||||||||||||||||||||||||||||
| ## Downloading and installing SD card content. | |||||||||||||||||||||||||||||||||||||||||||||||||||||||||||||||||||
|
|
|||||||||||||||||||||||||||||||||||||||||||||||||||||||||||||||||||
|
|
|||||||||||||||||||||||||||||||||||||||||||||||||||||||||||||||||||

There was a problem hiding this comment.
Choose a reason for hiding this comment
The reason will be displayed to describe this comment to others. Learn more.
This is not accurate!
First using
dfu-utilon Windows requires Zadig driver. So they are tied together. On Linux/MAC there is no need for Zadig driver (since driver is built into the kernel), only dfu-util is needed.Flashing from Companion, these are possible ways:
Then there is also procedure to update the OpenTX Bootloader itself. It is similar to the last option above, just the flashing is done from the regular OpenTX, using the same file.
There was a problem hiding this comment.
Choose a reason for hiding this comment
The reason will be displayed to describe this comment to others. Learn more.
So what is the goal of this section?
For me the goal is to guide users to get things done; not list every single technical way things can be done. These extra ways can be in an advanced trouble shooting section.
When it says there are two options to write the firmware it is under the sentence connect the transmitter to the computer in boot loader mode. Then there will be a boot loader screen image and then the rest of that text.
There was a problem hiding this comment.
Choose a reason for hiding this comment
The reason will be displayed to describe this comment to others. Learn more.
It does not need to explain every detail. But what it explains should be correct.
There was a problem hiding this comment.
Choose a reason for hiding this comment
The reason will be displayed to describe this comment to others. Learn more.
Agreed...
Writing The OpenTX Firmware
+Connect the transmitter to the computer in bootloader mode.
+There are two options to write the firmware:
+* Using The Bootloader Menu
+* Using Companion
So when the Tx is turned on in boot loader moder this screen appears
Now there are two choices
Write the firmeware using that menu
Plug in the usb cable and use companion to write the firmware
What is not accurate? What do I need to change?
It is formatted easier to read here
http://rcdiy.ca/opentx-guide/introduction-to-opentx-companion/#Writing_The_OpenTX_Firmware
There was a problem hiding this comment.
Choose a reason for hiding this comment
The reason will be displayed to describe this comment to others. Learn more.
We could add a separate section on boot loader... what it is and the ways it get updated...