Integrating javascript tags with Google Tag Manager
HOME > SNOWPLOW SETUP GUIDE > Step 2: setup a Tracker > Javascript tracker > Setting up the Javascript Tracker with Google Tag Manager This setup guide is divided into three sections:
- Setting up Google Tag Manager (GTM)
- Integrating Snowplow Javascript tracking tags with Google Tag Manager
- Next steps
If you have already setup Google Tag Manager on your website, you can proceed directly to section 2. However, we recommend at least skimming the section on setting up Google Tag Manager, as we've seen a number of companies implement this badly, with the end result that they cannot pass all the data they would like to Snowplow tags for analysis later.
## 1. Setting up Google Tag Manager (GTM)There are six steps to setting up GTM to the point you can integrate Snowplow (or any other web analytics tool) with GTM:
- Create a Google Tag Manager account
- Integrate the container tag on your website
- Work out what data to pass to Google Tag Manager from your website, using the
dataLayer - Work out how to structure the data passed into
dataLayer - Integrate the
dataLayeronto your website - Create macros for the variables stored in the
dataLayerin in the GTM UI
Typically, the steps people get wrong (or miss out alltogether) are steps 3-6. Getting them right is critical, however, because if you do not setup a robust mechanism for passing all the relevant data you want to report on in Snowplow (or any other web analytics program) into GTM, then GTM will not be able to pass that data into Snowplow, in turn. Either you will need to go back to your webmaster to add additional lines to your HTML / Javascript to pass the missing data points later, or you'll be forced to perform analysis without them. Managing the data pipeline between your website(s) and GTM is key.
### 1.1 Create a Google Tag Manager accountCreating a Google Tag Manager account is very simple. Log on to http://www.google.com/tagmanager/ and select the sign up now button. Once you have signed up, elect to create a New Account. Give the account a name and a timezone. Then within it, create a Container.

In general, you'll only need to setup a single account, and most likely a single container for each domain you manage. However, that is not necessarily the case:
- A container is a single GTM tag that you will install on your web pages instead of the individual tags from different web analytics and other vendors. If you use a common tag setup across many domains, then you can use the same container across multiple domains, rather than create a container for each domain. This might save administrative time in GTM, because you can then add and manage tags across all the domains in one go. (It is straightforward to add tags for a single domain within a multi-domain container setup, and to distinguish data collected from each domain, so there really is no disadvantage in using a single container across multiple domains.)
- An account is a grouping of containers for administrative purposes. In general, one account is all you would need. If you work with different teams to manage different containers, then it makes sense to group the containers used by each team into a single account, with each team member being granted access to the account.
Once you have created a container, Google will provide you with the actual container tag. You will need to integrate this on every web page on your website(s), in place of any tags that are currently directly integrated on those web pages. (These will need to be migrated into GTM.)

The embed code needs to be inserted on your web pages immediately after the opening <body> tag.
The [dataLayer] datalayer is a JSON that contains name value pairs of data points you wish to pass from your website into GTM. (And GTM can then, in turn, pass on to any tags that are managed in GTM, including Snowplow tags.)
Working out what data should be passed into the dataLayer is critical to ensuring that your GTM installation lasts. Getting it right, however, is not trivial. On the one hand, you need to be as comprehensive as possible: you need to identfiy every data point you might want to interrogate in your web analytics and make sure it is passed into the dataLayer. Otherwise it will not be possible to pass it on to Snowplow to use in analytics later.
On the other hand, you don't want to swamp GTM with lots of data that is never used: either becauese it is not passed onto any of the tags GTM manages, or because those points are never used as part of Snowplow analyses.
We recommend erring on the side of comprehensiveness: the cost of passing data into the dataLayer is small and Snowplow is built to house as much data as you can throw at it. As a process, we recommend:
- Start off with the different objects that make up your product or service universe. If you're a video site, like Youtube, than videos will be the main object that make up your universe. But users, comments, likes and channels are all other objects that make up the Youtube experience. (Each one of these will be represented in the CMS behind Youtube.)
- For each different object, think about what the key data points are that are interesting. For example, a video on Youtube will have an
id, aname, anauthor/produceretc. - Now consider what actions / events happen on a user journey. Each will typically involve the user interacting with one or more objects e.g. a video on the site. If the user likes a video, comments on a video or uploads a video, it will involve creating a new object.
- In general, each of the objects identified above should be pushed to the
dataLayer, with each of the associated data points. It may not be necessary to push all the associated data points for each object, because it may be possible to infer some from another. (For example, if we know theidof a video, we might be able to lookup theauthorfrom the CMS at a later stage.) But we want to pass enough data points in with each object to support any analysis, that we might want to perform, down the line, on that object. - The list of objects, data points, and events on the user journeys, should be documented. Those documents will be used in the next step, working out how to structure the data in the
dataLayer
Broadly speaking, there are two occasions we can pass data points into the dataLayer:
- When the page loads
- When an event occurs. (Which might not correspond to a page load because it is AJAX.) This might include watching a video, adding an item to the shopping basket, submitting a purchase, logging in.
In general, if the data point is directly related to the webpage being loaded, it makes sense to push that data point into the data layer at page load time. For example, if on the product pages on an online shop, it would make sense to push key product details (name, sku, price, category) with the page load, by inserting the following code in the page before the container tags:
<body>
	<script type="text/javascript">
		dataLayer = [{
      		'productSku': 'pbz00123',
      		'productName': 'The Original Rider Waite Tarot cards',
      		'productPrice': '9.99'
    	}];
	</script>
	 <!-- Google Tag Manager -->
  	...
  	<!-- End Google Tag Manager -->
</body>
GTM might then pass these data points into Snowplow as page level custom variables, for example.
We might equally want to record these data points on catalogue pages, where multiple products are listed. In this case, we could pass the three data points (productSku, productName and productPrice) in for each product as follows:
<body>
	<script type="text/javascript">
		dataLayer = [{
      		'products': [
	            	{'productSku': 'pbz00123', 'productName': 'The Original Rider Waite Tarot cards', 'productPrice': '9.99' },
	            	{'productSku': 'pbz00124', 'productName': 'Aleicester Crowley Thoth Tarot', 'productPrice': '12.99' },
	            	{'productSku': ...},
	            	{'productSku': ...},
            		...
            ]
    	}];
	</script>
	 <!-- Google Tag Manager -->
  	...
  	<!-- End Google Tag Manager -->
</body>
We could use this data to perform an analysis of which product on catalogue pages are most likely to be clicked on, and whether that varies by user segment, for example. Analogous data points related to videos and listing the videos displayed on a selection page could be used by a Youtube-like site that wanted to analyse what drove users to select particular videos from a selection.
In many cases, however, we will want to capture data related to specific events that occur on a user's journey, like playing a video, when those events occur, rather than when a page loads. In these cases, we can use dataLayer.push function to add new data points to the layer when an AJAX event like watching a video occurs. For example, we might trigger the following with a video play:
dataLayer.push(
	'event': 'playVideo',
	'videoId': 'vid-000-123',
	'videoName': 'Skateboarding dog',
	'videoAuthor': 'user-00121'
	'videoFormat': 'hd'
);
It is critical that whenever we want to capture data related to a specific event when that event occurs, the dataLayer.push function includes a field called event with a value set to the event type. That is because GTM uses the setting of value of the event field to trigger the firing of tags setup in GTM, and is hence essential to making Snowplow event tracking possible (because the Snowplow event tracking tag needs to fire following specfiic events) and the Snowplow ecommerce tracking possible (because that is, equally, triggered by specific purchase events.)
Now that we know what data we want to capture in the dataLayer, and when we want to capture each data point (either at page load time or with each event), we are in a position to finalise the documentation for the webmaster that makes it clear what variables to set in the dataLayer, and when. This will be the basis for integrating the dataLayer onto the website below.
Google has a number of suggestions for what fields should be captured in the dataLayer, and how they should be labelled. Those can be found [here] datalayer.
For the most part, these are just suggestions. However, some of them are more that. For example, if you want to use either Google Analytics ecommerce tracking, or Snowplow's own ecommerce tracking (which is closely modelled on Google's approach), you will need to set specific variables in your dataLayer. Instructions on how to do this is covered below in the specific section on ecommerce tracking.
Now that we've decided (and documented) what data to push to the dataLayer, and when, your webmaster should be in a position to integrate the dataLayer calls into your website.
Note - although we've separated this step out from step 1.2 integrating your container tag on your website, in practice you'd want to carry out both these steps simultaneously.
### 1.6 Create macros for the variables stored in the `dataLayer` in in the GTM UIPassing data into GTM via the dataLayer is great - but to get any value from that data, we need to be able to pass it on to the tags that GTM manages, including Snowplow.
Doing so is simple, if a little time consuming. For every top-level data field passed into GTM (e.g. products, videoId etc.), we need to create a dataLayer macro in GTM. The value of this macro will be set when the value is passed into the dataLayer, and we'll be able to pass the macros into any tags that are setup in GTM. (Instructions on how to do this for Snowplow tags will be given in the section on [integrating Snowplow] (#snowplow-setup) below.)
To create a new macro in GTM, click on the Create Macro button on the top right of the GTM screen (when you are logged into you account and container):
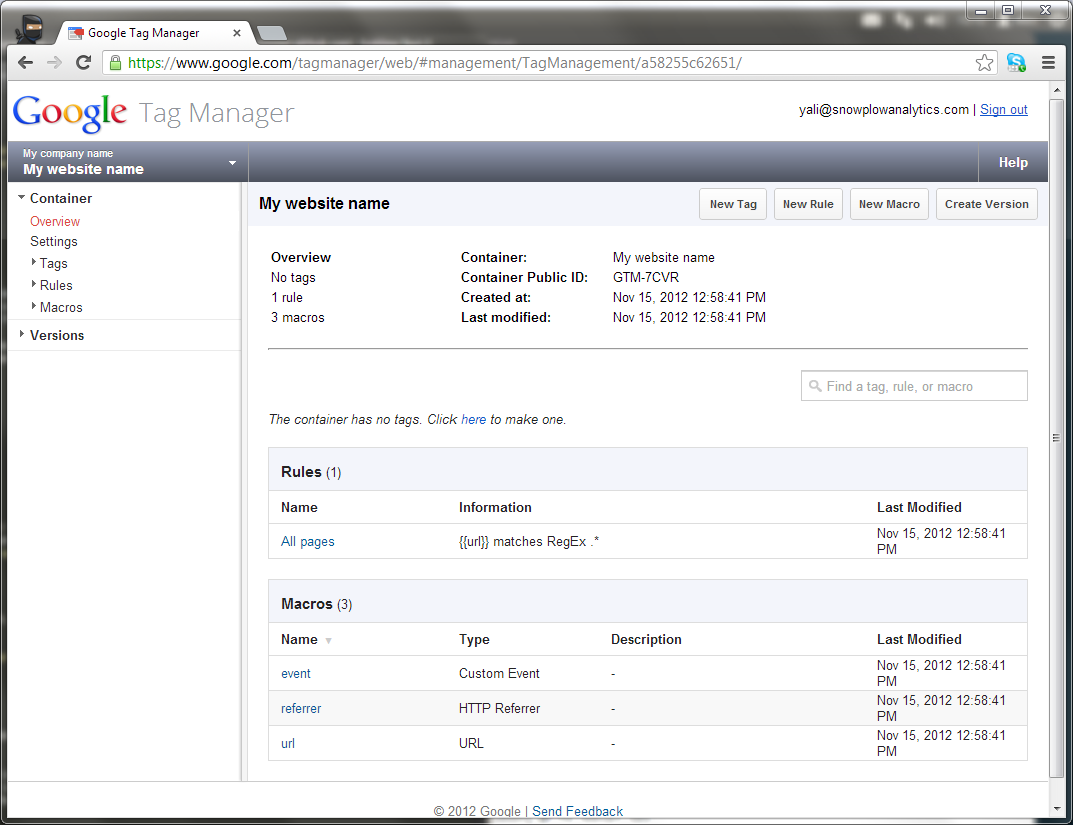
Give your macro an appropriate name. For simplicity, we always use the same name used in the dataLayer, although that is not a requirement. From the Macro Type dropdown, select Data Layer Variable. Then enter the name of the variable, exactly as used in the HTML / Javascript. (This is case sensitive.)
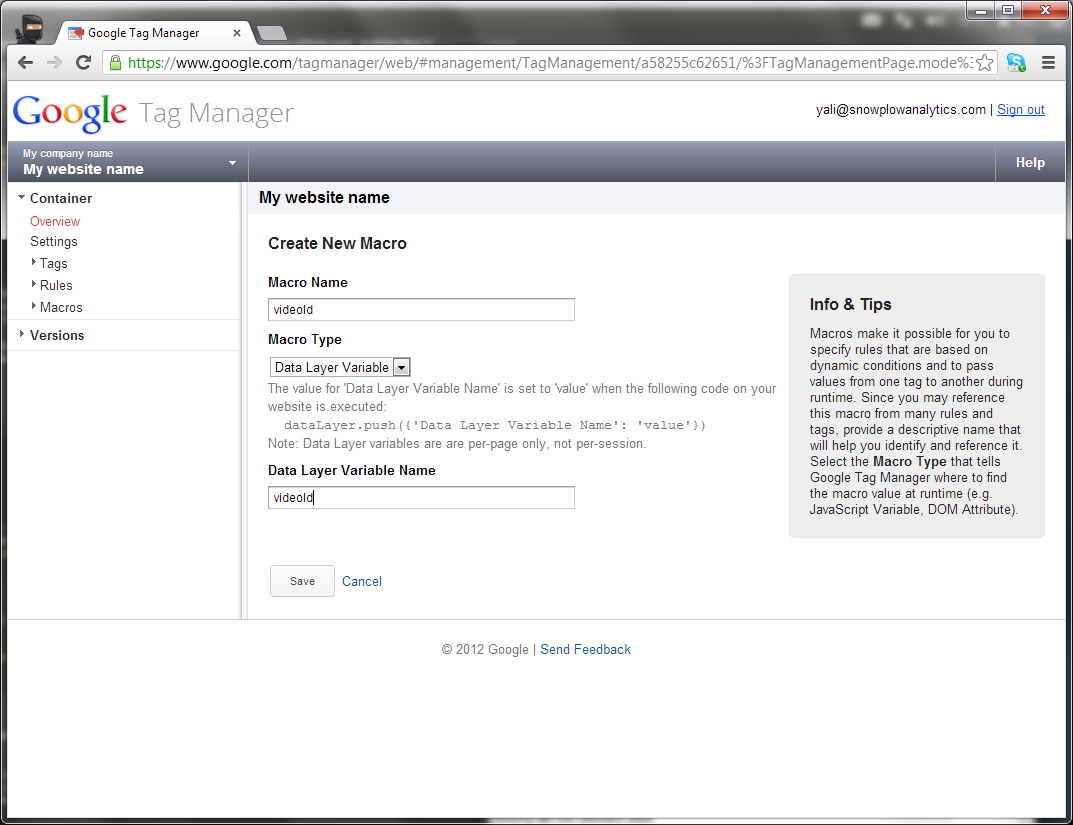
Save the new macro. It will now be visible in the container setup:

GTM comes pre-configured with three macros already: event, referrer and url. event is especially important. You can set GTM up to trigger the firing of tags when specific event types are pushed to the dataLayer. We use this to trigger both Snowplow event tracking tags, and ecommerce tracking tags, as explained below.
- Integrating Snowplow page tracking tags
- Integrating Snowplow structured event tracking tags
- Integrating Snowplow ecommerce tracking tags
- Tracking other events (campaigns, page pings)
- Publishing changes to GTM
This is the simplest tag to integrate.
First, click on the Create tag button on the top right of the GTM UI.
![]()
Give the tag a suitable name e.g. "Snowplow page tracker" and select Custom HTML Tag from the Tag type dropdown:
![]()
Now paste in the standard Snowplow page tracking code in the HTML box:
![]()
The actual code you need to insert is:
<!-- Snowplow starts plowing -->
<script type="text/javascript">
var _snaq = _snaq || [];

_snaq.push(['setCollectorCf', '{{CLOUDFRONT-DOMAIN}}']);
_snaq.push(['setAppId', '{{SITE-ID}}']);
_snaq.push(['setCookieDomain', '{{COOKIE-DOMAIN}}']);
_snaq.push(['trackPageView']);

(function() {
var sp = document.createElement('script'); sp.type = 'text/javascript'; sp.async = true; sp.defer = true;
sp.src = ('https:' == document.location.protocol ? 'https' : 'http') + '://d1fc8wv8zag5ca.cloudfront.net/0.12.0/sp.js';
var s = document.getElementsByTagName('script')[0]; s.parentNode.insertBefore(sp, s);
})();
 </script>
<!-- Snowplow stops plowing -->
You will need to update the {{CLOUDFRONT DOMAIN}} with the Cloudfront subdomain details you created as part of the collector setup. (If you are using a version of Snowplow hosted by the Snowplow team, we will provide you with a Cloudfront domain to enter.) It will look something like d3rkrsqld9gmqf. If you are using a different collector the Cloudfront collector (e.g. the Clojure collector), you will need to use the setCollectorUrl method instead. For full instructions on all the options available for setting the collector endpoint, see the Javascript tracker technical documentation.
The calls to setAppId and setCookieDomain are optional: the first is used if you are running Snowplow across different applications and want to distinguish data for each easily. setCookieDomain is used if you are tracking users across multiple subdomains e.g. 'blog.mysite.com', 'www.mysite.com', 'mysite.com'. Full instructions on the use of both these methods can be found in the Javascript tracker technical documentation.
If you are hosting your own Snowplow JavaScript file (see the guide to [Self-hosting snowplow.js] (https://github.com/snowplow/snowplow/wiki/Self-hosting-snowplow-js)), then you need to update the tag above, swapping your own {{CLOUDFRONT DOMAIN}} (the one from which you serve sp.js in for ours:
sp.src = ('https:' == document.location.protocol ? 'https' : 'http') + '://{{CLOUDFRONT DOMAIN}}.cloudfront.net/sp.js';![]()
Once the tag is inserted, we need to instruct GTM to fire this tag on every page load. This is straightforward: click on the +Add Rule to Fire Tag button.
![]()
Check the box next to All pages. This will ensure that the tag is fired for every page load. (If you had tags on e.g. www.mysite.com and test.mysite.com, you could create a new rule with a different URL regexp to only fire the tags on the production, rather than test site, and assign that rule to the tag.)
![]()
Now you're done - click Save. The new tag should be listed in the container summary screen.
Note: although set up, the tag wont fire until this update is published. We cover how to publish the configurations made above in section 2.4 below.
### 2.2 Integrating Snowplow structured event tracking tagsThis is best explained through an example. Let's assume, again, that we are implementing Snowplow on a Youtube-like video site. There will be a large number of possible events that occur on a user journey including searching for a video, playing a video, pausing a video, liking a video, uploading a video, sharing a video etc... As per steps 1.3, 1.4 and 1.5, each time one of these events occurs, the event is logged in the dataLayer along with the associated data. For example, for a 'video play', the following Javascript would execute:
dataLayer.push(
	'event': 'playVideo',
	'videoId': 'vid-000-123',
	'videoFormat': 'hd'
);
We now need to set up the Snowplow event tracking tag to fire for each of the types of event identified, and use the five [event tracking fields] event-tracking to pass the data into Snowplow. Those fields are documented [here] event-tracking, but for ease we list them below:
- Event category
- Event action
- Event label
- Event property
- Event value
Let's work through the process for our playVideo event type. From the main Tag Manager screen, click the New Tag button:
![]()
Give the tag a suitable name e.g. 'Snowplow playVideo event'. Select the Custom HTML Tag from the Tag Type dropdown:
![]()
In the HTML box below, we need to paste the Snowplow event tracking code. The generic code looks as follows:
<!-- Snowplow event tracking -->
<script type="text/javascript">
_snaq.push(['trackStructEvent', {{CATEGORY}}, {{ACTION}}, {{LABEL}}, {{PROPERTY}}, {{VALUE}}]);
</script>
We need to insert the above code, but substitude in the data points captured when a video is played in the dataLayer. To do that, we need to map those fields i.e.:
playVideovideoIdvideoFormat
To the five structured event tracking fields. (Note - if 5 fields are not enough, we are in the process extending Snowplow to accommodate 10 additional event custom variables and an 11th arbitrary JSON, that can be stuffed with additional data.)
How we do the mapping is really a matter of preference: the following would work:
playVideo data point |
Event tracking field |
|---|---|
category |
|
playVideo |
action |
videoId |
label |
videoFormat |
property |
value |
It would make sense to hardcode the category to video or media (so we can group all video related actions in our analysis), and to leave the value field blank. (This field could be used if there's revenue that can be attributed to the playVideo event, for example.)
To implement the above mapping, we update the HTML in the box to the following:
<!-- Snowplow structured event tracking -->
<script type="text/javascript">
_snaq.push(['trackStructEvent', 'video', 'playVideo', {{videoId}}, {{videoFormat}}, '0.0']);
</script>
The above code will dynamically insert the values in the dataLayer for videoId and videoFormat into the tag, which will pass the data into Snowplow. Note that this will only work if you have setup corresponding macros in GTM for videoId and videoFormat, as documented in [section 1.6] (#1.6).
![]()
Now that we've created the tag, we need to tell GTM to fire it every time a playVideo event occurs. To do that, click on the + Add Fule to Fire Tag button. Click on the Create new rule checkbox. Give the rule an appropriate name and set it to event equals playVideo:
![]()
Save the tag. It should now be listed alongside your Snowplow page tracker tag:
![]()
You now need to repeat the above process for each of the different types of events identified in your dataLayer i.e. uploadVideo, shareVideo, likeVideo etc. In each case, you will need to:
- Create a new tag in GTM i.e.
Snowplow shareVideo event,Snowplow uploadVideo event - Paste in the Snowplow event tracking code, but map the fields for the specific events into the 5 Snowplow event tracking fields
- Trigger the tag to fire when e.g.
event: uploadVideois passed into thedataLayer
Once you have completed creating all the tags, you will need to publish the updates (as detailed below) in order to push the changes live.
The above approach is time consuming because it requires that you create a Snowplow tag in GTM for every different type of event identified in the dataLayer.
An alternative approach would be not to distinguish different types of event in the dataLayer. Instead, for every type of custom event, use the same set of fields in the dataLayer that correspond to the five Snowplow event tracking fields i.e.:
dataLayer.push({
	'event': 'customEvent',
	'eventCategory': 'xxx',
	'eventAction': 'xxx',
	'eventLabel': 'xxx,
	'eventProperty': 'xxx',
	'eventValue': 'x.x'
});
Then we can create a single Snowplow event tag in GTM that is fired with every customEvent and maps the fields in the dataLayer directly into the Snowplow event tracking tag.
<!-- Snowplow structured event tracking -->
<script type="text/javascript">
_snaq.push(['trackStructEvent', '{{eventCategory}}', '{{eventAction}}', '{{eventLabel}}', '{{eventProperty}}', '{{eventValue}}']);
</script>
There are several reasons we do not recommend this approach:
- Although time consuming, the exercise of identifying all the relevant events that can occur on a user's journey, and all the data points that are associated with each, is incredibly useful. At analysis time, you would use the same mapping used to match those data points against the generic Snowplow event fields, to map them back into their 'idealised structure'.
- We're working to improve Snowplow all the time. If the current event tracking isn't flexible enough to accommodate your needs, it's highly likely that a future version will be. If you're not capturing all the data that you ideally want to be reporting on, in GTM, then when we upgrade Snowplow, you wont be able to take advantage without updating your GTM implementation.
- The whole point of using a tag management platform like GTM is to manage all your tags. The alternative approach outlined above is a Snowplow specific hack and will not necessarily work for other tags that are managed through GTM. In order to make it as easy as possible manage the widest variety of tags, you should pass all the data you might want to share with your tags into GTM in a sensible, comprehensible format, rather than one geared around a specific providers tag.
Snowplow's [ecommerce tracking] [ecom-tracking] closely follows ecommerce tracking as implemented in Google Analytics. We have done this to make implementing Snowplow alongside GA as easy as possible.
Because of this, however, it is important that you follow Google's specified approach to pushing transaction related data into the dataLayer, using the same field names and data structures used by Google. These are listed on the Google website and are repeated below for clarity:
| Variable name | Description |
|---|---|
transactionId |
Unique transaction ID |
transactionAffiliation |
Affiliation or store name |
transactionTotal |
Transaction value |
transactionShipping |
Shipping charge |
transactionTax |
Tax (VAT) charge |
transactionPaymentType |
Payment type (e.g. credit card) |
transactionCurrency |
Currency of transaction |
transactionShippingMethod |
Selected shipping method |
transactionPromoCode |
Discount or promotion codes used |
transactionProducts |
List of items purchased in the transaction (provided to the dataLayer as an array) |
The following data is supported for each of the products in the transactionProducts array:
| Variable name | Description |
|---|---|
id |
Product ID |
name |
Product name |
sku |
Product SKU |
category |
Product category |
price |
Unit price |
quantity |
Number of this item included in the order |
In addition, there are a number of additional data points that it is possible to capture using Snowplow ecommerce tracking through GTM, but we are unclear if Google supports. (GA ecommerce tracking supports the fields, but it is not clear if the GTM implementation of GA's ecommerce tracking supports them):
| Variable name | Description |
|---|---|
transactionCity |
City buyer is located in |
transactionState |
State or province buyer is located in |
transactionCountry |
Country buyer is located in |
In the dataLayer, a transaction needs to be recorded like the following example:
dataLayer.push({
	'event': 'transaction',
	'transactionId': 'order-123',
	'transactionAffiliation': 'web',
	'transactionTotal': '107.98',
	'transactionShipping': '2.99',
	'transactionTax': '2',
	'transactionCurrency': 'GBP',
	'transactionProducts': [
		  {'name': 'Blue_t-shirt', 'sku': '1001', 'category': 'ts', 'price': '4.99', 'quantity': '1'},
		  {'name': 'Red_shoes', 'sku': '1002', 'category': 'shoes', 'price': '50.00', 'quantity': '2'}
	],
	'transactionCity': 'London',
	'transactionCountry': 'United Kingdom'
});
As described in section 1.6, we need to create macros in GTM for each of the fields listed in the above three tables i.e. transactionId, transactionAffiliation... transactionCountry. To recap on the process:
- Click on the New Macro button in the GTM interface
- Name the new macro being created. (We recommend using exactly the same name used in the
dataLayere.g.transactionIdfor clarity) - Set the macro type to 'Data Layer Variable'
- Set the value of the macro to the field name given in the
dataLayere.g.transactionId - Save the macro
We then need to create a Snowplow ecommerce tracking tag in GTM that passes the data onto Snowplow on a transaction event. In GTM, select the New Tag button. Give the tag a sensible name e.g. 'Snowplow ecommerce tracker' and select 'custom HTML tag' in the tag type. Now in the HTML box, paste the following code:
<script type="text/javascript">
// 1st, fire 'addTrans' event for the new transaction
_snaq.push(['addTrans',
    {{transactionId}},
    {{transactionAffiliation}},
    {{transactionTotal}},
    {{transactionTax}},
    {{transactionShipping}},
    {{transactionCity}},
    {{transactionState}},
    {{transactionCountry}}
]);

// 2nd fire the 'addItem' event for each item included in the transaction
for(i=0; i<{{transactionProducts}}.length; i++) {
    _snaq.push(['addItem',
        {{transactionId}},
        {{transactionProducts}}[i].sku,
        {{transactionProducts}}[i].name,
        {{transactionProducts}}[i].category,
        {{transactionProducts}}[i].price,
        {{transactionProducts}}[i].quantity
    ]);
}

// Finally fire the 'trackTrans' event to commit the transaction
_snaq.push['trackTrans']
</script>
Note: if you did not name each of the transaction macros with the same names as specified in the dataLayer e.g. transactionId, you will need to update the references to those macro names in the above tag accordingly.
Now that our tag is ready, we need to trigger it to fire. Assuming we identify when transactions occur in the dataLayer using dataLayer.push({ 'event': 'transaction', ...});, we'll want to fire the Snowplow tag every time event equals transactions. To do this, click the + Add Rule to Fire Tag, select the option to Create new rule, name the rule e.g. 'transaction' and specify it:
![]()
The tag setup is now complete:
![]()
Save the tag. We are now ready to publish the changes. This is covered in the next section.
### 2.4 Tracking other events (campaigns, page pings etc.)As well as the page view, structured events and ecommerce event tracking tags, Snowplow has specific functionality to enable the capture of other event data including:
- [Page pings] (2-Specific-event-tracking-with-the-Javascript-tracker#wiki-pagepings). Use this to track how long visitors dwell on each page on your site, and how they scroll of pages over time.
Detailed documentation on how to capture the complete range of events possible with Snowplow can be found in the Javascript Tracker section of the [Technical Documentation] (snowplow-technical-documentation).
Note: we recommend after you finish consulting the technical documentation related to the events supported by the Javascript tracker that you return to the setup guide to complete the setup.
### 2.5 Publishing changes to GTMOnce you have setup all your tags, rules and macros in GTM, you need to publish the changes before they will take effect on your website(s).
This is a three step process:
- Create a version with all the most recent changes / updates
- Preview and debug the versin
- When you are confident it is working as expected, publish it
Creating a version is simple: click on the Create Version button on the top right of the GTM UI.

(Note your list of tags adn rules should be longer than that in the demo screenshot above.)
Click the Save and Preview button at the bottom. This launches preview mode:

Now load a web page with the container in a tab in the same browser. You should see an additional GTM interface in the bottom half of the screen that indicates when different tags defined in the UI have been fired.

If you are that the setup works as expected, click the Save and publish button. The updates will be pushed to live.
In the event that it is not working as expected, you can go back and make the changes you require. You will need to create a new version, with the updates, before you can either preview them, or publish them.
## 3. Next stepsNow you have setup the Javascript tracking tags, you are in a position to [test that they fire](testing the javascript tracker is firing).