Quick Start Rendering Smart Notifications
Welcome to our quick start guide on rendering Smart Notifications. This page will give you an introduction to how you can begin to render Smart Notifications in your client.
- About the major structural components of a Smart Notification
- How to render a Smart Notification Summary
- How to render a Smart Notification Detail
- You have completed Quick Start:Sending and Retrieving Smart Notifications
- You have a modern browser such as Chrome or Firefox available on your device
- You have familiarity with JavaScript and the HTML Document Object Model (DOM)
- You have access to a
gitclient in which to clone a repository to your local device - You have access to a text editor to edit HTML and JavaScript
In writing this quick start tutorial our goal is to focus on the Smart Notification concepts that are important to learn and not get bogged down on how we explicitly render the components. For this reason we're avoiding popular UI libraries and frameworks like Angular and React. Similarly, we're also avoiding using low-level JavaScript APIs (e.g. createElement and createTextNode) to facilitate element creation as that'll distract from the learning objective.
In this tutorial we'll be using a library called hyperscript to facilitate the creation of HTML DOM elements. It provides just enough abstraction to not create a distraction and keep our focus on learning Smart Notification concepts.
Now open a terminal on your device. Before we can proceed we need to make sure you still have your environment variables configured that were used in the prerequisite tutorial:
$ env | grep WORKGRID_
WORKGRID_APP_CLIENT_ID=<OMITTED>
WORKGRID_APP_CLIENT_SECRET=<OMITTED>
WORKGRID_USERNAME=<OMITTED>
WORKGRID_COMPANY_CODE=<OMITTED>
WORKGRID_APP_CLIENT_ACCESS_TOKEN=<OMITTED>
WORKGRID_SPACE_ID=<OMITTED>
WORKGRID_USER_CLIENT_ID=<OMITTED>
WORKGRID_USER_CLIENT_SECRET=<OMITTED>
If these variables are not set please revisit our Quick Start:Sending and Retrieving Smart Notifications to set them up.
The best way to understand the structure components of a Smart Notification is to send yourself a Smart Notification and retrieve it. We will then review the response we got back from our API.
Run the following curl command in your terminal to send your Smart Notification. Remember you may need to refresh your OAuth 2 token if your credentials have expired.
curl --request POST \
     --url https://${WORKGRID_COMPANY_CODE}.workgrid.com/v2/jobs \
     --header 'Content-Type: application/json' \
     --header "Authorization: Bearer ${WORKGRID_APP_CLIENT_ACCESS_TOKEN}" \
     --data "[
  {
    \"type\": \"notification.create\",
    \"data\": {
      \"location\": \"toknow\",
      \"audience\": [
        {
          \"type\": \"email\",
          \"value\": \"${WORKGRID_USERNAME}\"
        }
      ],
      \"version\": \"3.0\",
      \"localizations\": {
        \"en-US\": {
          \"category\": \"Test\",
          \"from\": {
            \"name\": \"Quick Start App\",
            \"iconUrl\": \"https://via.placeholder.com/64x64.png\"
          },
          \"summary\": {
            \"title\": \"Rendering Hello World\",
            \"body\": \"Sample body text with text that can be **bold**, _italicized_, [hyperlinked](https://www.workgrid.com). Data can also be displayed \n1. In \n2. A \n3. list\",
            \"image\": {
              \"url\": \"https://via.placeholder.com/64x64.png?text=Summary%20Image\",
              \"altText\": \"Summary Image\"
            }
          },
          \"actions\": [
            {
              \"type\": \"Action.Submit\",
              \"actionType\": \"primary\",
              \"title\": \"Primary Submit Action\",
              \"data\": {
                \"user-action\": \"primary-action\"
              },
              \"displayInSummary\": true
            },
            {
              \"type\": \"Action.OpenUrl\",
              \"actionType\": \"transparent\",
              \"title\": \"Go to Workgrid\",
              \"url\": \"https://www.workgrid.com\",
              \"displayInSummary\": true
            }
          ],
          \"detail\": {
            \"type\": \"card\",
            \"body\": [
              {
                \"type\": \"ColumnSet\",
                \"columns\": [
                  {
                    \"type\": \"Column\",
                    \"items\": [
                      {
                        \"type\": \"TextBlock\",
                        \"text\": \"Lorem ipsum dolor sit amet, consectetur adipiscing elit, sed do eiusmod tempor incididunt ut labore et dolore magna aliqua. Nulla posuere sollicitudin aliquam ultrices sagittis orci a. Luctus accumsan tortor posuere ac ut consequat. Pellentesque eu tincidunt tortor aliquam nulla facilisi cras fermentum.\"
                      }
                    ]
                  },
                  {
                    \"type\": \"Column\",
                    \"items\": [
                      {
                        \"type\": \"TextBlock\",
                        \"text\": \"Lorem ipsum dolor sit amet, consectetur adipiscing elit, sed do eiusmod tempor incididunt ut labore et dolore magna aliqua. Lectus sit amet est placerat. Risus nullam eget felis eget nunc. Non tellus orci ac auctor augue mauris augue neque.\"
                      }
                    ]
                  },
                  {
                    \"type\": \"Column\",
                    \"items\": [
                      {
                        \"type\": \"TextBlock\",
                        \"text\": \"Lorem ipsum dolor sit amet, consectetur adipiscing elit, sed do eiusmod tempor incididunt ut labore et dolore magna aliqua. Praesent semper feugiat nibh sed pulvinar proin gravida hendrerit. Nisl nisi scelerisque eu ultrices vitae. Faucibus ornare suspendisse sed nisi lacus.\"
                      }
                    ]
                  }
                ]
              }
            ]
          }
        }
      }
    }
  }
]"
Now we'll retrieve this Smart Notification and talk about all its major properties in turn. Run the following command to retrieve the notification:
curl --request GET \
     --url "https://${WORKGRID_COMPANY_CODE}.workgrid.com/v1/toknow?orderBy=date" \
     --header "Authorization: Bearer ${WORKGRID_USER_TOKEN}" \
     --header 'Accept: application/vnd.com.workgrid.ast+json;version=1' \
     --header "x-workgrid-space: ${WORKGRID_SPACE_ID}"
You should get a response like this:
{
  "notifications": [
    {
      "id": "f0600d49-1380-4889-b643-c7c6872a0b5c",
      "correlationId": "9b8bcb7f-07df-4962-af01-a9e8b51dd461",
      "priority": "informational",
      "category": "Test",
      "firstSeenDate": "2022-07-13T18:17:50.942Z",
      "hiddenBefore": "2022-07-13T18:17:43.742Z",
      "hiddenAfter": "2022-10-11T18:17:43.742Z",
      "actionStatus": "none_taken",
      "displayLifecycle": "simple",
      "sortValue": "00003000300000000000000000001657736265",
      "section": "toknow",
      "isVisible": true,
      "version": 3,
      "actions": [
        {
          "type": "Action.Submit",
          "actionType": "primary",
          "title": "Primary Submit Action",
          "data": {
            "workgridActionableDataId": "8d4db24c-721d-4f2d-8315-8d6906e320ac"
          },
          "displayInSummary": true,
          "causesValidation": true,
          "id": "Primary Submit Action"
        },
        {
          "type": "Action.OpenUrl",
          "actionType": "transparent",
          "title": "Go to Workgrid",
          "url": "https://workgridsoftware.dev.workgrid.com/v1/tracking?urlId=98125155-e372-4eca-84ea-ffc6c20f6eec&url=aHR0cHM6Ly93d3cud29ya2dyaWQuY29t",
          "displayInSummary": true
        }
      ],
      "from": {
        "name": "Quick Start App",
        "iconUrl": "https://via.placeholder.com/64x64.png"
      },
      "isDeletable": true,
      "title": {
        "type": "Title",
        "children": [
          {
            "type": "paragraph",
            "children": [
              {
                "type": "text",
                "value": "Rendering Hello World"
              }
            ]
          }
        ]
      },
      "body": {
        "type": "Body",
        "children": [
          {
            "type": "paragraph",
            "children": [
              {
                "type": "text",
                "value": "Sample body text with text that can be "
              },
              {
                "type": "strong",
                "children": [
                  {
                    "type": "text",
                    "value": "bold"
                  }
                ]
              },
              {
                "type": "text",
                "value": ", "
              },
              {
                "type": "emphasis",
                "children": [
                  {
                    "type": "text",
                    "value": "italicized"
                  }
                ]
              },
              {
                "type": "text",
                "value": ", "
              },
              {
                "type": "link",
                "title": null,
                "url": "https://workgridsoftware.dev.workgrid.com/v1/tracking?urlId=0d122bfd-742d-4259-9b3a-efd522e1778d&url=aHR0cHM6Ly93d3cud29ya2dyaWQuY29t",
                "children": [
                  {
                    "type": "text",
                    "value": "hyperlinked"
                  }
                ]
              },
              {
                "type": "text",
                "value": ". Data can also be displayed "
              }
            ]
          },
          {
            "type": "list",
            "ordered": true,
            "start": 1,
            "spread": false,
            "children": [
              {
                "type": "listItem",
                "spread": false,
                "checked": null,
                "children": [
                  {
                    "type": "paragraph",
                    "children": [
                      {
                        "type": "text",
                        "value": "In "
                      }
                    ]
                  }
                ]
              },
              {
                "type": "listItem",
                "spread": false,
                "checked": null,
                "children": [
                  {
                    "type": "paragraph",
                    "children": [
                      {
                        "type": "text",
                        "value": "A "
                      }
                    ]
                  }
                ]
              },
              {
                "type": "listItem",
                "spread": false,
                "checked": null,
                "children": [
                  {
                    "type": "paragraph",
                    "children": [
                      {
                        "type": "text",
                        "value": "list"
                      }
                    ]
                  }
                ]
              }
            ]
          }
        ]
      },
      "image": {
        "type": "Image",
        "properties": {
          "url": "https://via.placeholder.com/64x64.png?text=Summary%20Image",
          "altText": "Summary Image"
        }
      },
      "detail": {
        "type": "Detail",
        "children": [
          {
            "type": "ColumnSet",
            "properties": {
              "separator": false
            },
            "children": [
              {
                "type": "Column",
                "properties": {
                  "separator": false
                },
                "children": [
                  {
                    "type": "TextBlock",
                    "properties": {
                      "separator": false
                    },
                    "children": [
                      {
                        "type": "paragraph",
                        "children": [
                          {
                            "type": "text",
                            "value": "Lorem ipsum dolor sit amet, consectetur adipiscing elit, sed do eiusmod tempor incididunt ut labore et dolore magna aliqua. Nulla posuere sollicitudin aliquam ultrices sagittis orci a. Luctus accumsan tortor posuere ac ut consequat. Pellentesque eu tincidunt tortor aliquam nulla facilisi cras fermentum."
                          }
                        ]
                      }
                    ]
                  }
                ]
              },
              {
                "type": "Column",
                "properties": {
                  "separator": false
                },
                "children": [
                  {
                    "type": "TextBlock",
                    "properties": {
                      "separator": false
                    },
                    "children": [
                      {
                        "type": "paragraph",
                        "children": [
                          {
                            "type": "text",
                            "value": "Lorem ipsum dolor sit amet, consectetur adipiscing elit, sed do eiusmod tempor incididunt ut labore et dolore magna aliqua. Lectus sit amet est placerat. Risus nullam eget felis eget nunc. Non tellus orci ac auctor augue mauris augue neque."
                          }
                        ]
                      }
                    ]
                  }
                ]
              },
              {
                "type": "Column",
                "properties": {
                  "separator": false
                },
                "children": [
                  {
                    "type": "TextBlock",
                    "properties": {
                      "separator": false
                    },
                    "children": [
                      {
                        "type": "paragraph",
                        "children": [
                          {
                            "type": "text",
                            "value": "Lorem ipsum dolor sit amet, consectetur adipiscing elit, sed do eiusmod tempor incididunt ut labore et dolore magna aliqua. Praesent semper feugiat nibh sed pulvinar proin gravida hendrerit. Nisl nisi scelerisque eu ultrices vitae. Faucibus ornare suspendisse sed nisi lacus."
                          }
                        ]
                      }
                    ]
                  }
                ]
              }
            ]
          }
        ]
      }
    }
  ]
}There are a number of properties at the top-level of a notification that are of particular importance when rendering a Smart Notification. Not all are discussed here, but we'll call a few out that will be part of the renderer in this tutorial. See the inline comments in the JSON sample below:
{
  "notifications": [
    {
      /* other properties omitted for brevity */

      /* Describes how important the notification is. You would typically want some sort of visual indicator on the notification to convey how important the notification is */
      "priority": "informational",

      /* A app defined category to display to the user. It can be anything that is relevant to your application. */
      "category": "Test",

      /* A notification can have different actions. Some actions will be sent back to your system as illustrated in a prior tutorial and others
      such as the one below allow a user to open an external link */
      "actions": [
        {
          "type": "Action.Submit",
          "actionType": "primary",
          "title": "Primary Submit Action",
          "data": {
            "workgridActionableDataId": "8d4db24c-721d-4f2d-8315-8d6906e320ac"
          },
          "displayInSummary": true,
          "causesValidation": true,
          "id": "Primary Submit Action"
        },
        {
          "type": "Action.OpenUrl",
          "actionType": "transparent",
          "title": "Go to Workgrid",
          "url": "https://workgridsoftware.dev.workgrid.com/v1/tracking?urlId=98125155-e372-4eca-84ea-ffc6c20f6eec&url=aHR0cHM6Ly93d3cud29ya2dyaWQuY29t",
          "displayInSummary": true
        }
      ],

      /* Indicates who the notification is from with text and an image to be displayed */
      "from": {
        "name": "Quick Start App",
        "iconUrl": "https://via.placeholder.com/64x64.png"
      },

      /* Title of the notification. */
      "title": {
        "type": "Title",
        /* This is the first example of our rendering data structure. Renderable elements typically have a `type` and typically a `children` property to be iterated over
        to process content that needs to be rendered */
        "children": [
          {
            "type": "paragraph",
            "children": [
              {
                "type": "text",
                "value": "Rendering Hello World"
              }
            ]
          }
        ]
      },

      /* The body represents a brief textual summary of what the notification is. */
      "body": {
        "type": "Body",
        /* Same structure as the Title above */
        "children": [ /* omitted for brevity */ ]
      },

      /* Notifications can have an image to help make it stand out or aid in the identification of the content */
      "image": {
        "type": "Image",
        "properties": {
          "url": "https://via.placeholder.com/64x64.png?text=Summary%20Image",
          "altText": "Summary Image"
        }
      },

      /* The detail, which is typically not presented to the user initially, represents content that is displayed when the user wants to view
       more information about the notification. Similar to the `title` and `body` attributes the detail contains a `children` property of renderable components. */
      "detail": {
        "type": "Detail",
        "children": [ /* omitted for brevity */ ]
      }
    }
  ]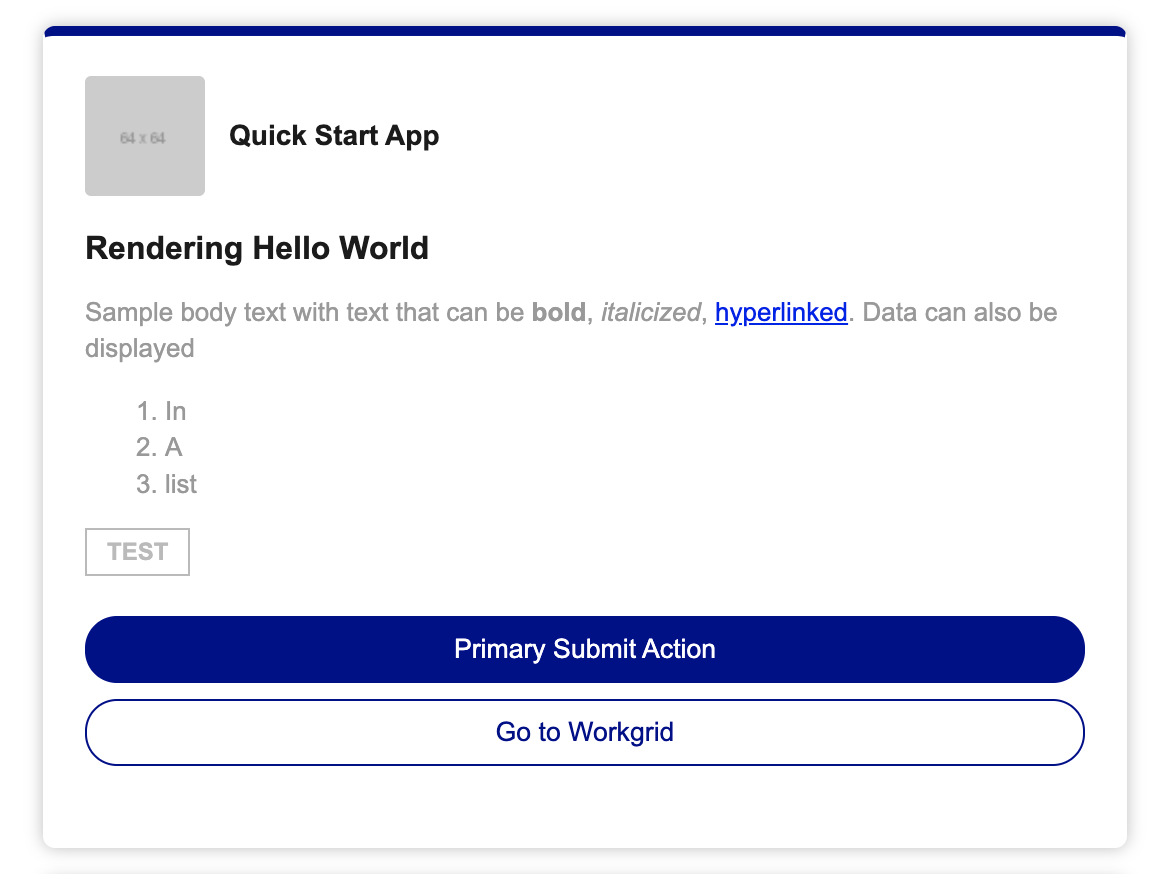
}For the remainder of this tutorial we'll be building our renderer. When we're complete with this section our renderer will produce a Smart Notification that looks like this:

Using the terminal on your device clone the repository we'll be using for this tutorial by running the command below:
git clone https://github.com/Workgrid/headless-documentation.gitYou should see output like this:
$ git clone https://github.com/Workgrid/headless-documentation.git
Cloning into 'headless-documentation'...
remote: Enumerating objects: 3, done.
remote: Counting objects: 100% (3/3), done.
remote: Compressing objects: 100% (2/2), done.
remote: Total 3 (delta 0), reused 0 (delta 0), pack-reused 0
Receiving objects: 100% (3/3), 4.44 KiB | 4.44 MiB/s, done.
Then change to the directory where we will be working by running the command below:
cd headless-documentation/quick-start-rendererThere are two files in this folder: index-start.html and index-complete.html. We will be starting with index-start.html to build our renderer. If you have any trouble along the way refer to the index-complete.html file as it represents the completed tutorial. Now open the index-start.html file in your text editor as well as a browser.
Before we get to building our renderer we will touch on a few items in this HTML file that will help set the stage for the builder. First and foremost we have a few constants to set namely your WORKGRID_COMPANY_CODE, WORKGRID_SPACE_ID, and WORKGRID_USER_TOKEN. They are grouped together like this in the file:
const WORKGRID_COMPANY_CODE = '<company-code>';
const WORKGRID_SPACE_ID = '<space-id>';
const WORKGRID_USER_TOKEN = '<user-token>';
Due to CORS (Cross-Origin Resource Sharing) we cannot dynamically fetch the user token so you will have to periodically resort to the curl commands from the Quick Start:Sending and Retrieving Smart Notifications tutorial to get a token and update the WORKGRID_USER_TOKEN constant.
Near the bottom of the file you will find a function named retrieveNotifications. This function will fetch the notifications you sent earlier in the tutorial. Further up in the HTML file you will find a function named createRenderer as shown below:
function createRenderer(
  notification,
  { companyCode, spaceId, userToken, submitActionCallback }
) {
  function render(node) {
    if (isRootOfNotification(node)) {
    }

    switch (
      node.type
      // Non-leaf nodes
      // ================================================================

      // // Text Elements
      // // ================================================================

      // // Leaf nodes
      // // ================================================================
    ) {
    }
  }

  function renderChildren(node) {
    return node.children.map((node) => render(node));
  }

  return (node) => render(node);
}
This is where most of the code will go to create our renderer. The render function has two main branches of code. The first block of code inside the if statement will serve to render the "root element" of our notification, the summary. The second branch is a switch statement that branches based on the node type. Each renderable component has a different type property. This allows us to determine what to render as the expectations and properties are different for each type. As you can see above the renderChildren function calls render. As we progress through the tutorial you will notice a lot of calls to renderChildren to facilitate recursively traversing the tree of Smart Notification components. Now let's get started.
We will now render who the notification came from. This will involve using the from property of the notification to render the iconUrl and name in our browser. This is the first use of the hyperscript library. The h function from the hyperscript library below, outputs a DOM element we provide as well as any additional elements as children of it. The snippet of code we will be adding inside the render function is shown below:
return h(
  'div.summary',
  { id: node.id },
  h(
    'div.from__container',
    h('img.from__icon', {
      src: notification.from.iconUrl,
      alt: notification.from.name,
    }),
    h('p.from__title', notification.from.name)
  )
);
Place this code inside the if(isRootOfNotification) block as shown below:
       function render(node) {
         if (isRootOfNotification(node)) {
+          return h('div.summary',
+            {id: node.id},
+            h('div.from__container',
+              h('img.from__icon', {src: notification.from.iconUrl, alt: notification.from.name}),
+              h('p.from__title', notification.from.name)
+            )
+          )
         }
Now if you go over to your browser your notification should look like this:

We will now render the title of the notification. This will involve using the title property of the notification and rendering its components. This is the first component we're rendering that has a children property. First we'll add the render of the title property to our notification root with this snippet of code:
render(notification.title),Place this code here:
             h('div.from__container',
               h('img.from__icon', {src: notification.from.iconUrl, alt: notification.from.name}),
               h('p.from__title', notification.from.name)
-            )
+            ),
+            render(notification.title),
Now we're going to render the Title element by adding this code:
          case 'Title':
            return h('h1.summary__title', renderChildren(node))
Place the code inside the switch statement as shown below:
         switch (node.type) {
           // Non-leaf nodes
           // ================================================================
-
+          case 'Title':
+            return h('h1.summary__title', renderChildren(node))
Now you are probably thinking that if you switch over to your browser you will see our title, but you will not. Our Title node has a children property, and we have not added the code to render those pieces yet which we will do now. We will now render the paragraph and text components by adding this code:
          case 'paragraph':
            return h('p', renderChildren(node))
          case 'text':
            return node.value
Place this code here:
           // // Text Elements
           // // ================================================================
-
+          case 'paragraph':
+            return h('p', renderChildren(node))
           // // Leaf nodes
           // // ================================================================
-
+          case 'text':
+            return node.value
         }
Now if you go over to your browser your notification should look like this:

We will now render the body of the notification. This will involve using the body property of the notification and rendering its components. First we'll add the render of the body property to our notification root with this snippet of code:
render(notification.body),Place this code after the render of the title as shown below:
             ),
             render(notification.title),
+            render(notification.body),
Now we're going to render the Body element by adding this code:
          case 'Body':
            return h('div.summary__body', renderChildren(node))
Place the code inside the switch statement as shown below:
           case 'Title':
             return h('h1.summary__title', renderChildren(node))
+          case 'Body':
+            return h('div.summary__body', renderChildren(node))
Now if you go over to your browser your notification should look like this:

There's something wrong here. Not all of the information we sent in our notification is being displayed. This indicates that we're missing render methods for additional types of components. When we sent the notification in it included text that is supposed to be bold, italicized, hyperlinked and a list of items. Let's add each one of these in turn by using this code below:
          case 'list':
            return h(node.ordered ? 'ol.list' : 'ul.list', renderChildren(node))
          case 'listItem':
            return h('li.list-item', renderChildren(node))
          case 'strong':
            return h('b', renderChildren(node))
          case 'emphasis':
            return h('em', renderChildren(node))
          case 'link':
            return h('a', {href: node.url}, renderChildren(node))
Place this code in the switch statement as shown below:
           case 'paragraph':
             return h('p', renderChildren(node))
+          case 'list':
+            return h(node.ordered ? 'ol.list' : 'ul.list', renderChildren(node))
+          case 'listItem':
+            return h('li.list-item', renderChildren(node))
+          case 'strong':
+            return h('b', renderChildren(node))
+          case 'emphasis':
+            return h('em', renderChildren(node))
+          case 'link':
+            return h('a', {href: node.url}, renderChildren(node))
With this block of code added we now have support for bold & italicized formatting, links and lists in our renderer! Your notification should now look like this:

We will now render the notification category. This will involve using the category property of the notification which is a simple string value. The snippet of code we will be adding inside the render function is shown below:
h('div.summary__category', notification.category),Place this code after the render of the body as shown below:
             render(notification.title),
             render(notification.body),
+            h('div.summary__category', notification.category),
           )
Now if you go over to your browser your notification should look like this:

We will now render any actions that should display on the summary. This will involve using the actions property of the notification which is an array of actions. The snippet of code we will be adding inside the render function is shown below:
            h('div.action__container',
              notification.actions.filter(action => action.displayInSummary).map(action => render(action))
            ),
As you can see above we're applying a filter to only render the actions that have the displayInSummary property set to true. For those that should render in summary we recursively call the render method with the action.
Place this code after the render of the category as shown below:
             h('div.summary__category', notification.category),
+            h('div.action__container',
+              notification.actions.filter(action => action.displayInSummary).map(action => render(action))
+            ),
           )
Now if you go over to your browser you will notice that our actions have not rendered. Like when we were rendering the body there are components that we have not added code to render yet namely our Action.Submit and Action.OpenUrl action types. The code to add support for these action types is the following:
          case 'Action.Submit': {
            let cssClass

            switch (node.actionType) {
              case 'primary':
                cssClass = 'btn__primary'
                break;
            }

            const submitAction = async e => {
              e.preventDefault()

              const response = await fetch(`https://${companyCode}.workgrid.com/v1/usernotifications/${notification.id}/action`, {
                method: 'post',
                headers: {
                  Authorization: `Bearer ${userToken}`,
                  'Content-Type': 'application/json',
                  'x-workgrid-space': spaceId
                },
                body: JSON.stringify({
                  type: 'Action.Submit',
                  data: node.data
                })
              })

              if (!response.ok) {
                throw new Error('Request was unsuccessful')
              }

              submitActionCallback(notification.id)
            }
            return h(`button.btn.${cssClass}`, {onclick: submitAction}, node.title)
          }
          case 'Action.OpenUrl': {
            return h(`button.btn.btn__transparent`, {
              onclick: function (e) {
                e.preventDefault();
                window.open(node.url)
              }
            }, node.title)
          }
This part is a bit complicated, but we'll walk through it. First let's discuss the Action.OpenUrl code as it's easier to reason about. In the case block for this action type we're adding a button element with an onClick handler that opens the url property of the action in a new browser tab or window. Conceptually the Action.Submit case block is doing something similar but the onClick handler is very different. In this case the onClick handler (the function named submitAction) is making an API call to our endpoint to "action" that notification as you learned in the Quick Start Actioning and Processing Smart Notifications tutorial. If the API call is successful it invokes the submitActionCallback which would remove that notification from your view.
Place this in the switch statement as shown below:
           case 'text':
             return node.value
+          case 'Action.Submit': {
+            let cssClass
+
+            switch (node.actionType) {
+              case 'primary':
+                cssClass = 'btn__primary'
+                break;
+            }
+
+            const submitAction = async e => {
+              e.preventDefault()
+
+              const response = await fetch(`https://${companyCode}.workgrid.com/v1/usernotifications/${notification.id}/action`, {
+                method: 'post',
+                headers: {
+                  Authorization: `Bearer ${userToken}`,
+                  'Content-Type': 'application/json',
+                  'x-workgrid-space': spaceId
+                },
+                body: JSON.stringify({
+                  type: 'Action.Submit',
+                  data: node.data
+                })
+              })
+
+              if (!response.ok) {
+                throw new Error('Request was unsuccessful')
+              }
+
+              submitActionCallback(notification.id)
+            }
+            return h(`button.btn.${cssClass}`, {onclick: submitAction}, node.title)
+          }
+          case 'Action.OpenUrl': {
+            return h(`button.btn.btn__transparent`, {
+              onclick: function (e) {
+                e.preventDefault();
+                window.open(node.url)
+              }
+            }, node.title)
+          }
         }
       }
Now if you go over to your browser your notification should look like this:
Go head and click on the actions. One action should open the Workgrid website in a new tab or browser window. The other will action the notification removing it from view. If you action the notification be sure to send yourself another notification before continuing the tutorial.
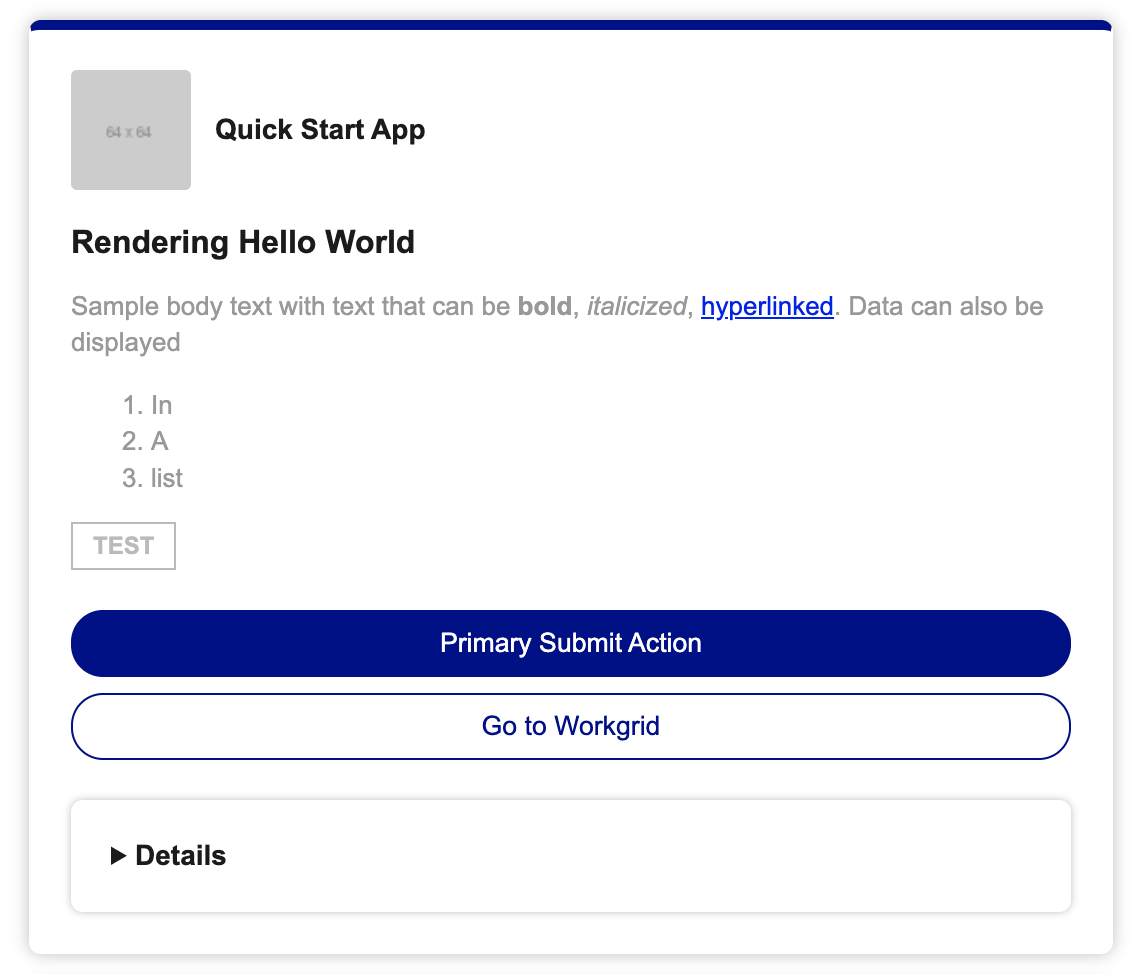
When we're complete with this section our renderer will produce a Smart Notification that looks like this:

We will now render the detail of the notification. This will involve using the detail property of the notification and rendering its components. First we'll add the render of the detail property to our notification root with this snippet of code:
notification.detail ? render(notification.detail) : undefined;Place this code here:
             h('div.action__container',
               notification.actions.filter(action => action.displayInSummary).map(action => render(action))
             ),
+            notification.detail ? render(notification.detail) : undefined
           )
Now we're going to render the Detail element by adding this code:
          case 'Detail':
            return h('details.detail', h('summary.detail__title', 'Details'), renderChildren(node), h('div.action__container'))
Place the code inside the switch statement as shown below:
           case 'Body':
             return h('div.summary__body', renderChildren(node))
+          case 'Detail':
+            return h('details.detail', h('summary.detail__title', 'Details'), renderChildren(node), h('div.action__container'))
           // // Text Elements
Now head over to your browser. You should see a new expandable element named details. Click the arrow to expand, and you will notice it's empty. Our Detail node has a children property, and we have not added the code to render those pieces yet which we'll do now. We will now render the ColumnSet, Column and TextBlock components which this notification has by adding this code:
          case 'ColumnSet':
            return h('div.column-set', renderChildren(node))
          case 'Column':
            return h('div.column-set__column', renderChildren(node))
          case 'TextBlock':
            return h('div', renderChildren(node))
Place the code inside the switch statement as shown below:
           case 'Detail':
             return h('details.detail', h('summary.detail__title', 'Details'), renderChildren(node), h('div.action__container'))
+          case 'ColumnSet':
+            return h('div.column-set', renderChildren(node))
+          case 'Column':
+            return h('div.column-set__column', renderChildren(node))
+          case 'TextBlock':
+            return h('div', renderChildren(node))
Now go over to your browser and expand the detail. It should look like this:

We will now render the actions of the smart notification on the tutorial. This will involve using the actions property of the notification which is an array of actions. With the work to add the actions to summary we are already most of the way there. All we need to do here is update our renderer to add the actions as children to our detail component. We'll modify the existing render code for the detail and replace it with this:
return h(
  'details.detail',
  h('summary.detail__title', 'Details'),
  renderChildren(node),
  h(
    'div.action__container',
    notification.actions.map((action) => render(action))
  )
);
Replace the line with the return statement for the Detail component as shown below:
           case 'Detail':
-            return h('details.detail', h('summary.detail__title', 'Details'), renderChildren(node), h('div.action__container'))
+            return h('details.detail', h('summary.detail__title', 'Details'), renderChildren(node), h('div.action__container', notification.actions.map(action => render(action))))
           case 'ColumnSet':
Now head over to your browser and expand the detail. It should now contain the actions and look like this:
Congratulations! You have just built your first Smart Notification renderer. There are many more component types, and nuances to building a production-ready renderer. Please visit our documentation here for all our component types and their properties.