Software
To get the device working, the microcontroller needs a bootloader and a firmware. Both need to compile first on a PC and then flash onto the microcontroller with a programmer. The prerequirements for the following steps are:
- A host system to build the bootloader and the firmware. You don't need them if you use the precompiled versions. To build the latest code, a Unix or OSX system with the proper tools is preferred. You need the
avr-gccto compile the source andavrdudeto transfer the binary to the microcontroller. - A programmer to transfer the bootloader and the firmware to the device and set some fuse bits. All sorts of programmers works here. If you don't have one, look at this list. Good programmers are the AVRDragon, STK500 or the USBProg. All programmers are multi purpose programmers to use with all kinds of (AVR) microcontrollers.
- If your computer doesn't have a serial RS232 interface, you need a serial to USB adapter to connect the HackStick to the computer.
The first step is to make sure all needed software packages and tools to build the firmware and the bootloader and finally to flash the microcontroller from within your computer are installed correctly. If you are using Ubuntu, install the following packages.
apt-get install avrdude
apt-get install gcc-avr binutils-avr avr-libc
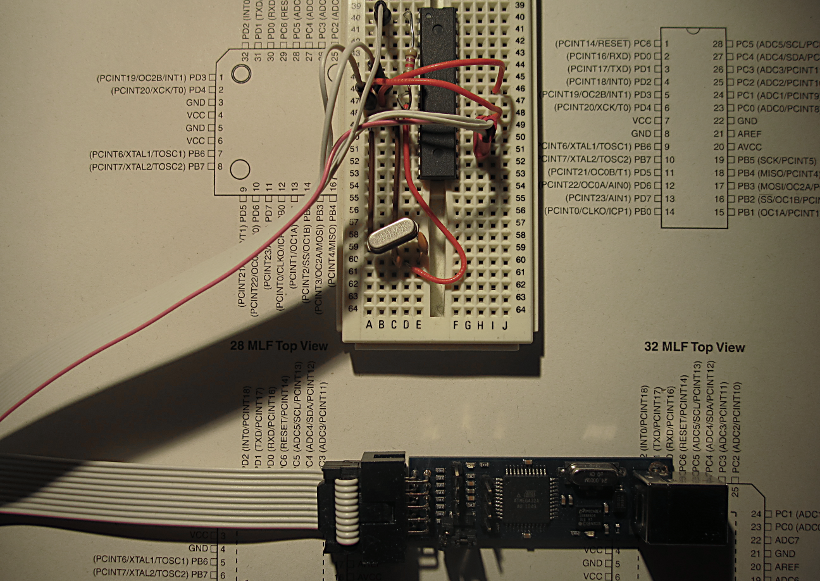
There are several different programmers out there. If you want to use a AVR ISP 2 (mk2) compatible programmer, you can use a simple breadboard and some wires to flash the device. Take a look into the data sheet and connect your programmer. Don't forget to plug in a 5V supply and an external quartz crystal with two 27p capacitors. After setting the fuses to work with the external quartz, the microcontroller stops working if you don't connect it to an external clock. The RESET pin should be pulled to LOW with a resistor connected to GND. If you use an ATK500 or something else, you can just plug the microcontroller into the socket and go for it.
Some brand new ATMEGA microcontrollers have some strange prewritten EEPROM which is a problem. We can fix this by reading the EEPROM, fix it with an HEX-editor and write it back to the device.
avrdude -c avrisp2 -P usb -p m328p -U eeprom:r:eeprom.hex:i
Change the first bytes to 0x00 with a hex editor. Alterntively you can use the file /firmware/eeprom_fixed_first_bytes.hex which has allready fixed this issue. After that, write it back to the EEPROM.
avrdude -c avrisp2 -P usb -p m328p -U eeprom:w:eeprom_fixed_first_bytes.hex:i
Go into the /bootloader/USBaspLoader.{newest date}/firmware and open the Makefile file. Adjust the PROGRAMMER variable to your programmer. If you use a AVR ISP 2 compatible programmer, you can leave this setting unchanged.
Type make fuse to set the fuses on the microcontroller. After that, we can compile the bootloader with make. Push the bootloader to the device with make flash.
Now its time to check if the HackStick itself is detected as a USBasp programmer. (Thats a feature to flash the firmware to the device without a programmer, because the HackStick itself acts as a programmer.) Plug the microcontroller into the socket on the HackStick, bridge the jumper and stick it in a USB slot on your computer. You can check if it works with the /bootloader/test_usbasp.sh script. If it doesn't work, you have to set some permissions:
vim /etc/udev/rules.d/8x-usbprog.rules
Add/Change the following line
ATTR{idVendor}=="16c0", ATTR{idProduct}=="05dc", GROUP="plugdev", MODE="0660"
The HackStick now can operate in two different modes: If you bridge the jumper (jumper is set), the HackStick is detected as a USBProg programmer on a computer. Use this setting to flash a new firmware onto the device without a programmer. If you pull of the jumper, the HackStick is detected as the device the HackStick is simulating or as a HackStick. This is the normal mode.
Bridge the jumper on the HackStick (close) and plug it in an USB slot on your computer. Go to the /firmware directory and compile the source with make. After that, transfer the firmware to the device directly with make program. Now you can pull off the jumper and reconnect the device to the USB port. The HackStick should now appear in the /var/log/syslog like this
generic-usb 0003:16C0:05DF.0005: hiddev96,hidraw3: USB HID v1.01 Device [klaute's HackStick] on usb-0000:00:12.2-5.4/input0
and the green POWER LED will be go on.
To prevent the bootloader from damage, it is advisable to lock the bootloader for further changes. Execute make lock in the /bootloader/USBaspLoader.{newest date}/firmware directory for that.
The HackStick is fully setup to work with. Plug it into a USB port on your computer to give the HackStick a 5V power supply and boot the microcontroller. Plug in your serial to RS232 connector and connect it with the HackStick. Now you can stablish a connection with the following command:
screen /dev/ttyUSB0
Try help and have fun!